
Step 1. AI draft
Enter one line about your topic and Nubint fills in the title, headings, and opening sections with citations. Three steps: prompt, search scope, heading style.
Find all the help you need for using Nubint.
Follow the path from your first Nubint draft to a polished, well-sourced manuscript. One pass takes about ten minutes.
Enter one line about your topic and Nubint fills in the title, headings, and opening sections with citations. Three steps: prompt, search scope, heading style.
Put the cursor at the end of a paragraph and Nubint suggests what comes next. Presets let you take a single sentence or finish the whole paragraph.
Select the sentence you want to change, say how you want it rewritten, and Nubint reworks it. You review the result before applying it.
Five reviews — peer review, proofreading, claim credibility, source quality, and tone of voice — point out the weak spots in your draft. Each finding jumps to the sentence it refers to.
Search 460 million papers for prior work. Every result comes with the reason it was picked.
Save straight from search results. The more papers you keep, the more accurate autocomplete and citation suggestions become.
Paste in a whole paragraph and Nubint finds the right paper for each claim, inserting citations sentence by sentence.
Export the finished manuscript as DOCX, PDF, or LaTeX. The citations you inserted and the reference list carry over in the style you picked.
Chat comes down to deciding what to show the AI (attachments) and what to let it look for (search permissions). Those settings determine whether answers carry citations.
Click the paperclip attach button in the chat input and pick a PDF — it uploads and connects to the conversation at once. Uploaded papers are also saved to your library, so you can reuse them later in other chats via context.
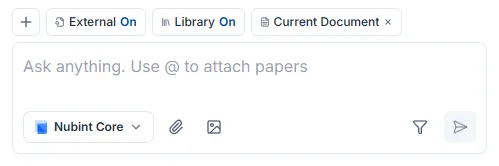
PDFs go through the paperclip button and images (JPEG, PNG, WebP) through the image button. Word documents like DOCX cannot be attached to chat — use the editor's document import instead.
If the AI cannot read your PDF, it is most likely a scan. Check whether the body text can be selected in a PDF viewer — if it cannot, the text exists only as an image and nothing can be extracted. A PDF with a real text layer works better.
Uploads have a monthly limit per plan. See the pricing page for details.
Context is the material the AI refers to when it answers. The + button in the chat input sets two things — attachments, the material you point at yourself, and search permissions, which decide whether the AI may go looking on its own. They are not mutually exclusive: what you attach and what it finds are combined.
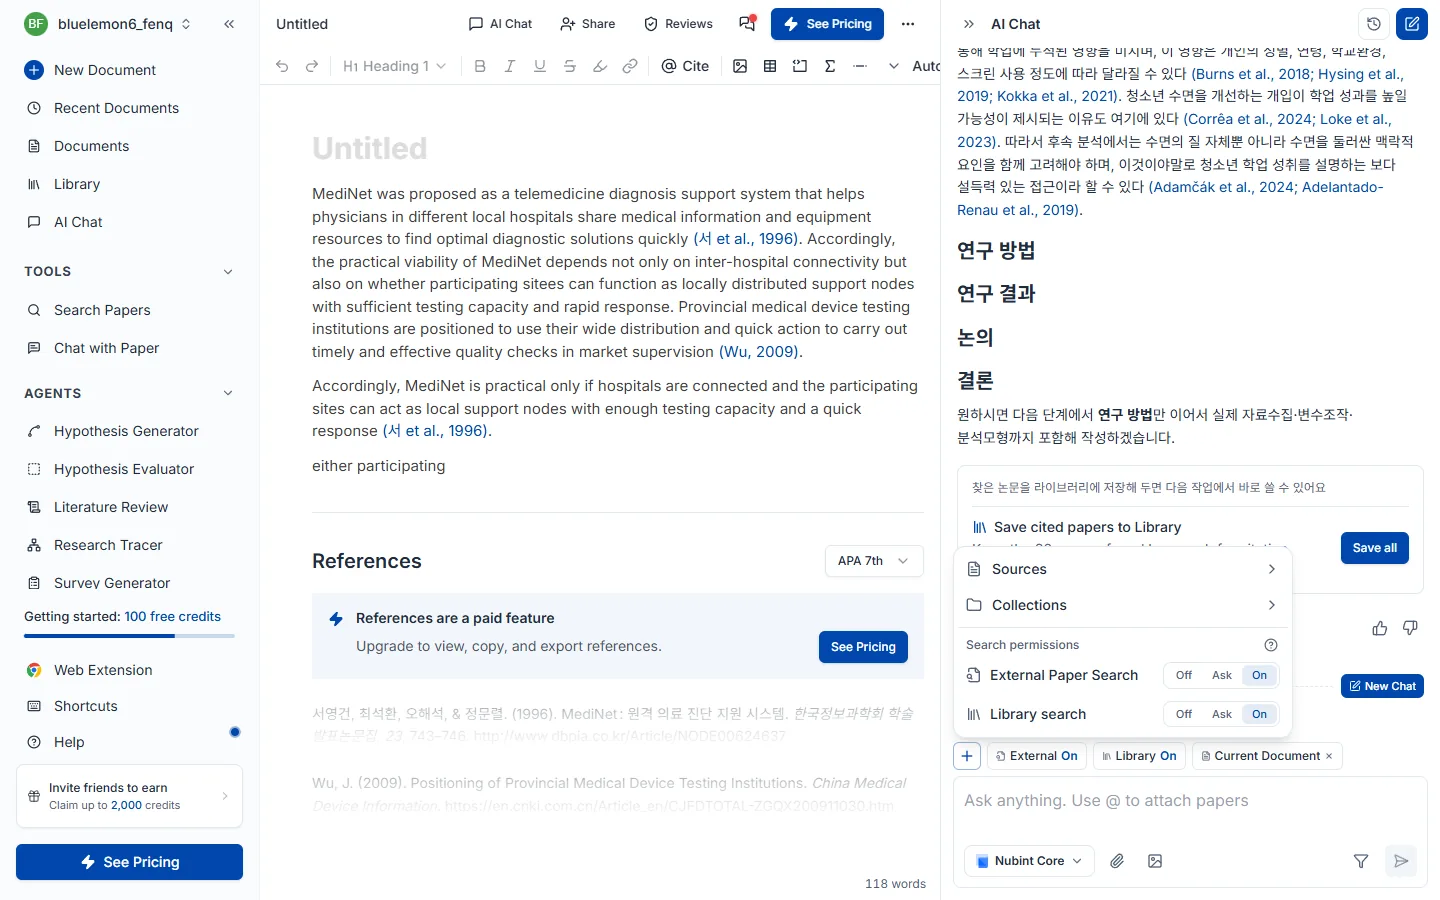
To attach material yourself, pick from the + menu.
Typing @ in the input also attaches a library paper directly, and papers not in your library can be attached as PDFs. Attached material appears as chips above the input; the X removes them.
Search permissions have three states — off, ask, and on — set separately for external paper search and library search.

| Mode | Behavior | Use it when |
|---|---|---|
| Off | No searching — answers from attached material only | You want to discuss only the papers you specified, or save credits |
| Ask | Asks first when a search is needed, and searches on approval | You want to see what it pulls in before it does |
| On | Searches whenever it judges a search is needed | You want to hand over the source gathering entirely |
External paper search pulls new papers from a 460M-paper academic database, and library search picks relevant ones from your library. Both can be on at once — we suggest turning external search on early in a project to explore broadly, then switching to library-only while drafting so it works from what you already have.
If citations are not appearing, check this setting first. When both searches are off and nothing is attached, the AI has no papers to reference and answers without citations.
By situation:
| Your situation | Setting |
|---|---|
| I want to ask about this one paper | Attach it as a source + search permissions off |
| I want to draft only from papers I collected | Attach a collection, or turn library search on |
| I have a topic but no material yet | Turn external paper search on |
| I want my draft revised | Attach the current document |
| I want to see what it pulls in as I go | Set search permissions to ask |
While the AI is generating a response, the stop button in the input halts it immediately. Whatever was already generated stays.
Attach a PDF or pull in library papers through context, then ask. You can ask about anything in the paper — the core contribution, the method, how to read the results and limitations, terminology.
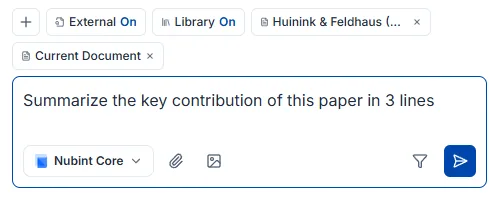
You can work across several papers at once. Attach a collection as context or select multiple papers, and the AI compares and synthesizes them — questions like "put the methodological differences between these papers in a table" or "what limitation do all three point to?" belong here.
Click a citation number in an answer to see which paper it came from. How citations get attached is covered in Citations in answers.
Citation numbers appear only on papers the AI actually consulted — search results and papers connected through context or attachments. It does not invent sources. Click a citation number in an answer to see the paper details and save it to your library.
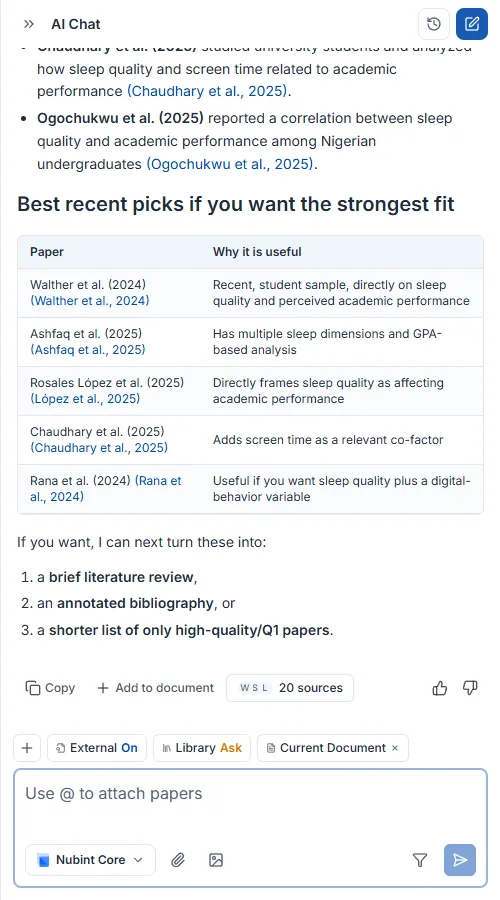
If citations are missing, there were no papers to reference. With all search permissions off and nothing attached, the AI answers from general knowledge and adds no citations. Check at least one of these:
Within the same chat, papers cited in earlier answers can continue to be cited later. To start the conversation fresh, create a new chat.
Click New chat at the top of the chat panel to start a fresh conversation. The previous one is saved automatically, and you can pick it from the chat list to return to that point and keep asking.

Start a new one when you move to a different research question, or when a conversation has run long and you want to reset the focus of the answers.
Build a skeleton with an AI draft, fill the body with autocomplete and AI edit, attach citations, then export to Word or LaTeX.
A new document offers three ways to start: Start with an AI draft (you have a topic but no idea where to begin), Start from a Word file (continue a .docx manuscript you already have), and Start with a blank document (the structure is already in your head).
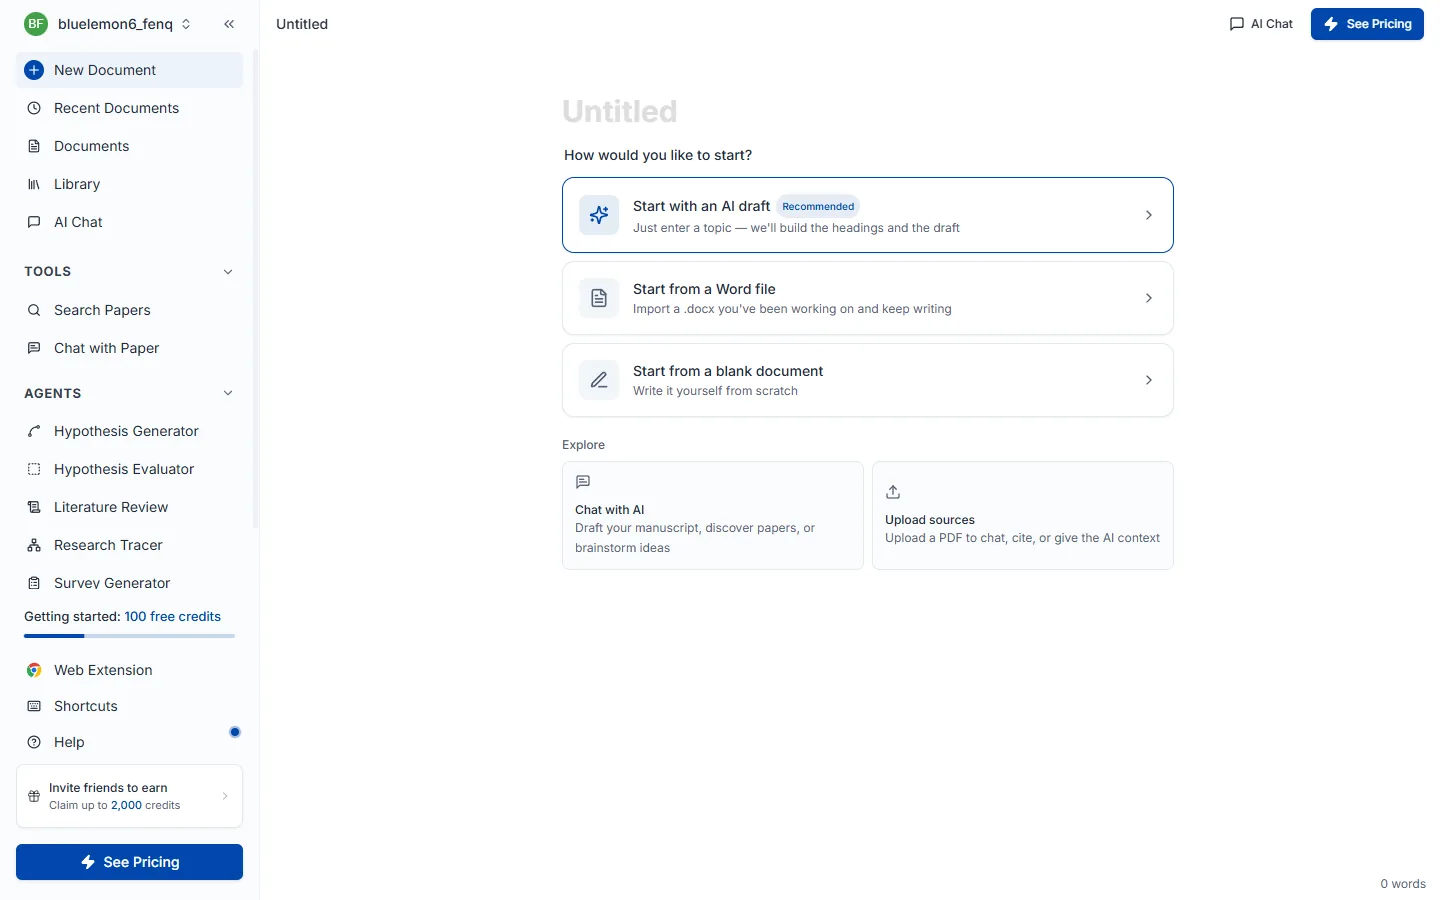
Choosing AI draft opens a three-step wizard; you have to pass all three to reach the final Write AI draft button.
Step 1 — Draft prompt. Write the topic of your paper in one or two sentences. This is what the AI searches prior work against and writes from. The bar under the input is prompt strength, filling from light to deep green as you add words. Leaving the topic blank blocks the next step.
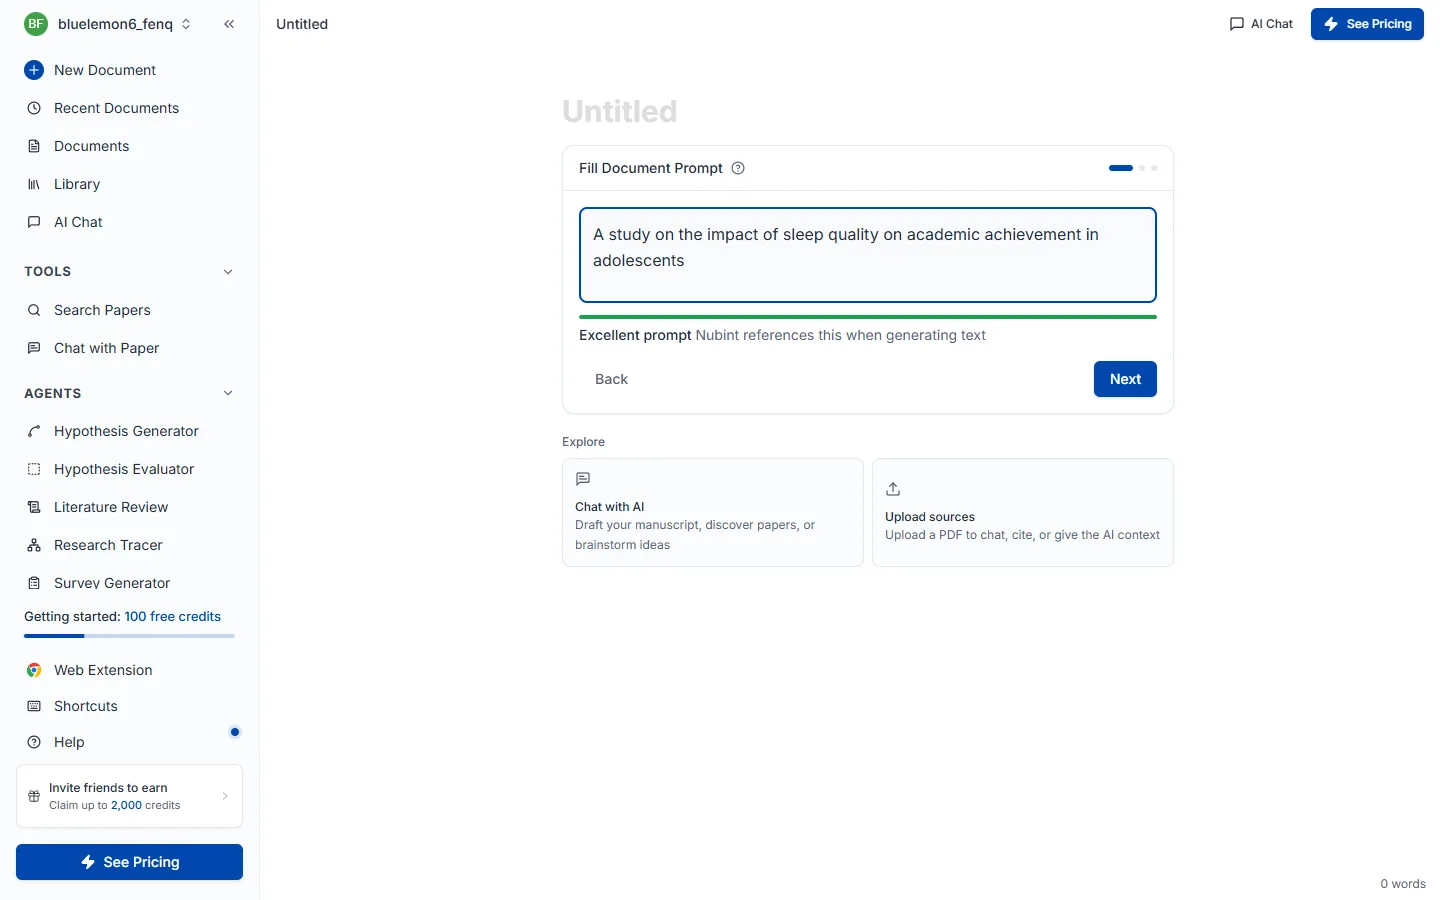
A good example is A study on the effect of sleep quality on academic achievement in adolescents; a weak one is sleep — with no population, outcome variable, or scope, search results scatter.
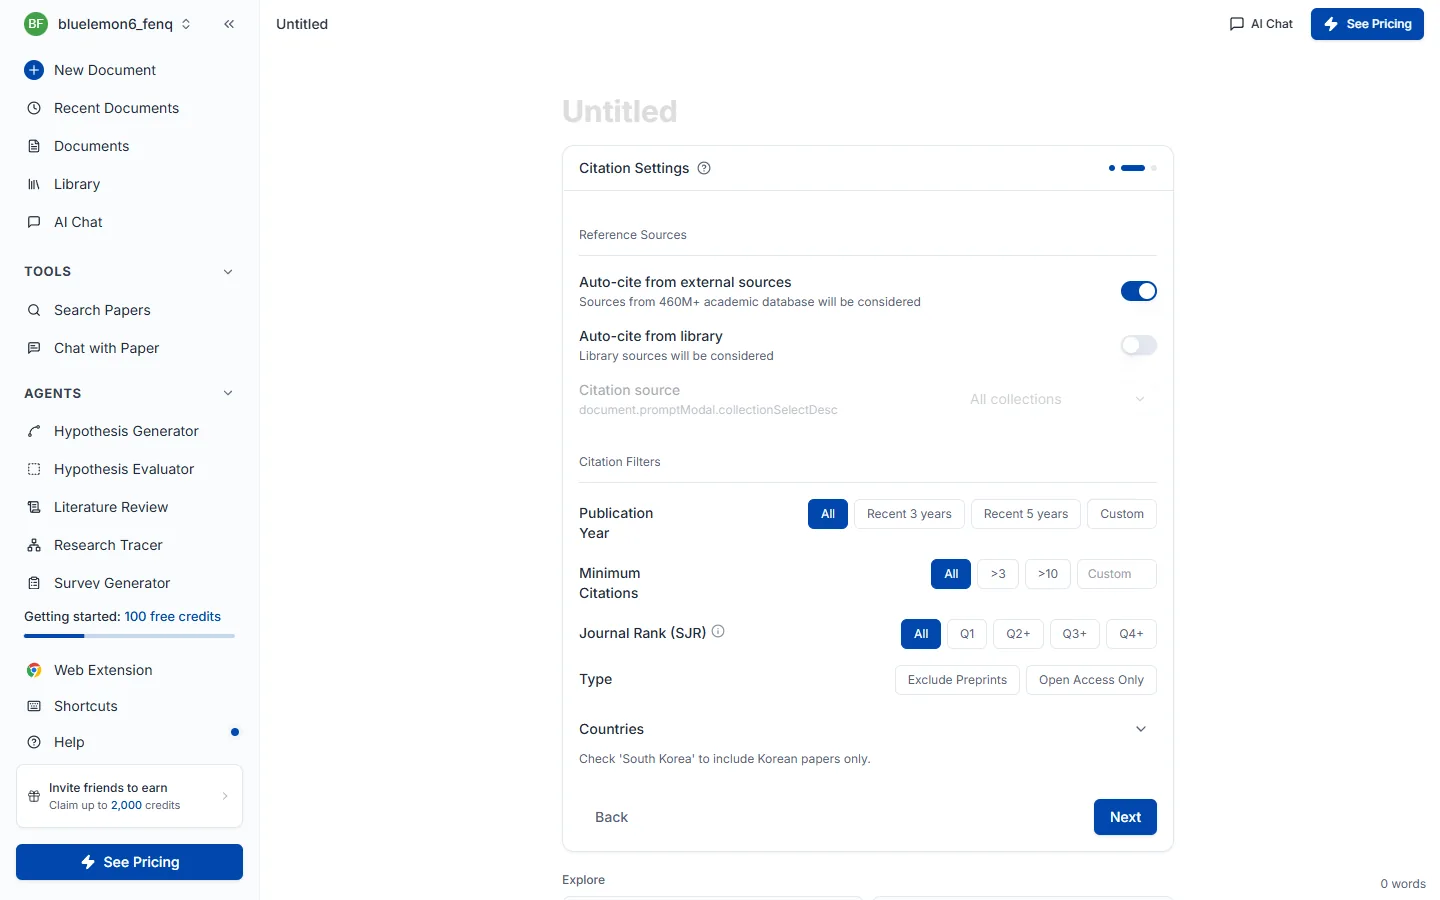
Step 2 — Citation settings. What you pick here applies to every sentence written afterwards. Reference source decides whether to auto-cite from external sources (a 460M-paper academic database) or only from papers saved in your library (which you can narrow further by collection). Citation filters let you constrain publication year, minimum citation count, journal rank (SJR), type, and country; left alone, it searches the full range.
Step 3 — Heading settings. Choose the skeleton of the paper. Standard headings (IMRaD) gives the fixed six-part structure — introduction, background, methods, results, discussion, conclusion — while smart headings has the AI compose five top-level headings with two subheadings each, fitted to your topic. Experimental and survey-based papers suit standard headings; theoretical or interdisciplinary work where IMRaD fits poorly suits smart headings. You can also switch the AI model used for drafting at the top.
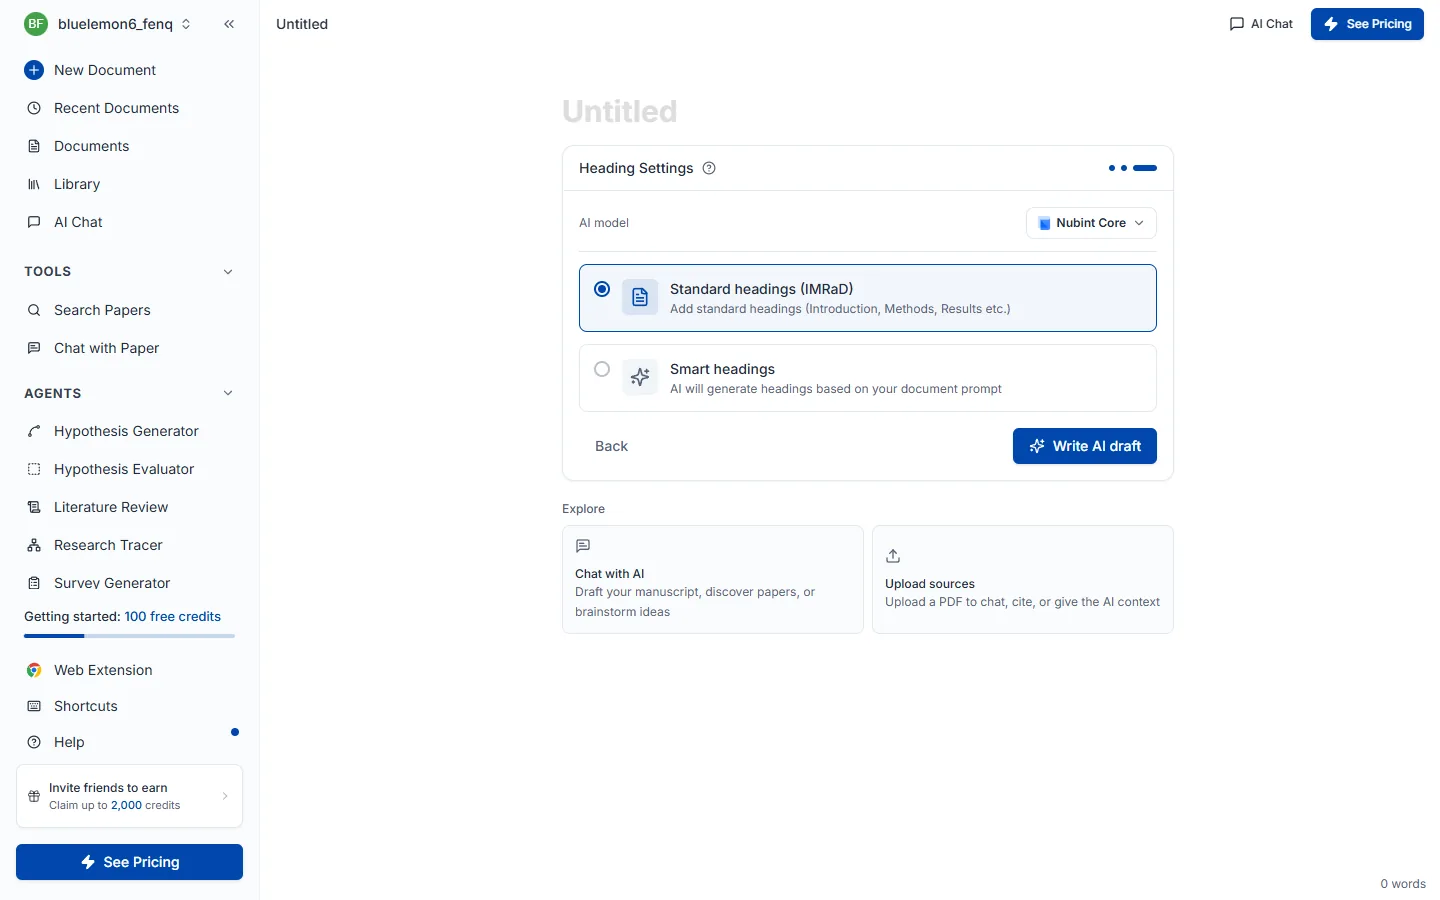
Pressing Write AI draft searches prior work, inserts the title (H1) and outline, and writes the body of the first two sections with citations. The remaining sections are left as headings for you to continue. Citation numbers like [1] appear in the text and the reference list builds itself at the bottom of the document. It usually takes about a minute.
From there, develop the draft with AI autocomplete for new sentences, AI edit for polishing, and the review panel for checks.
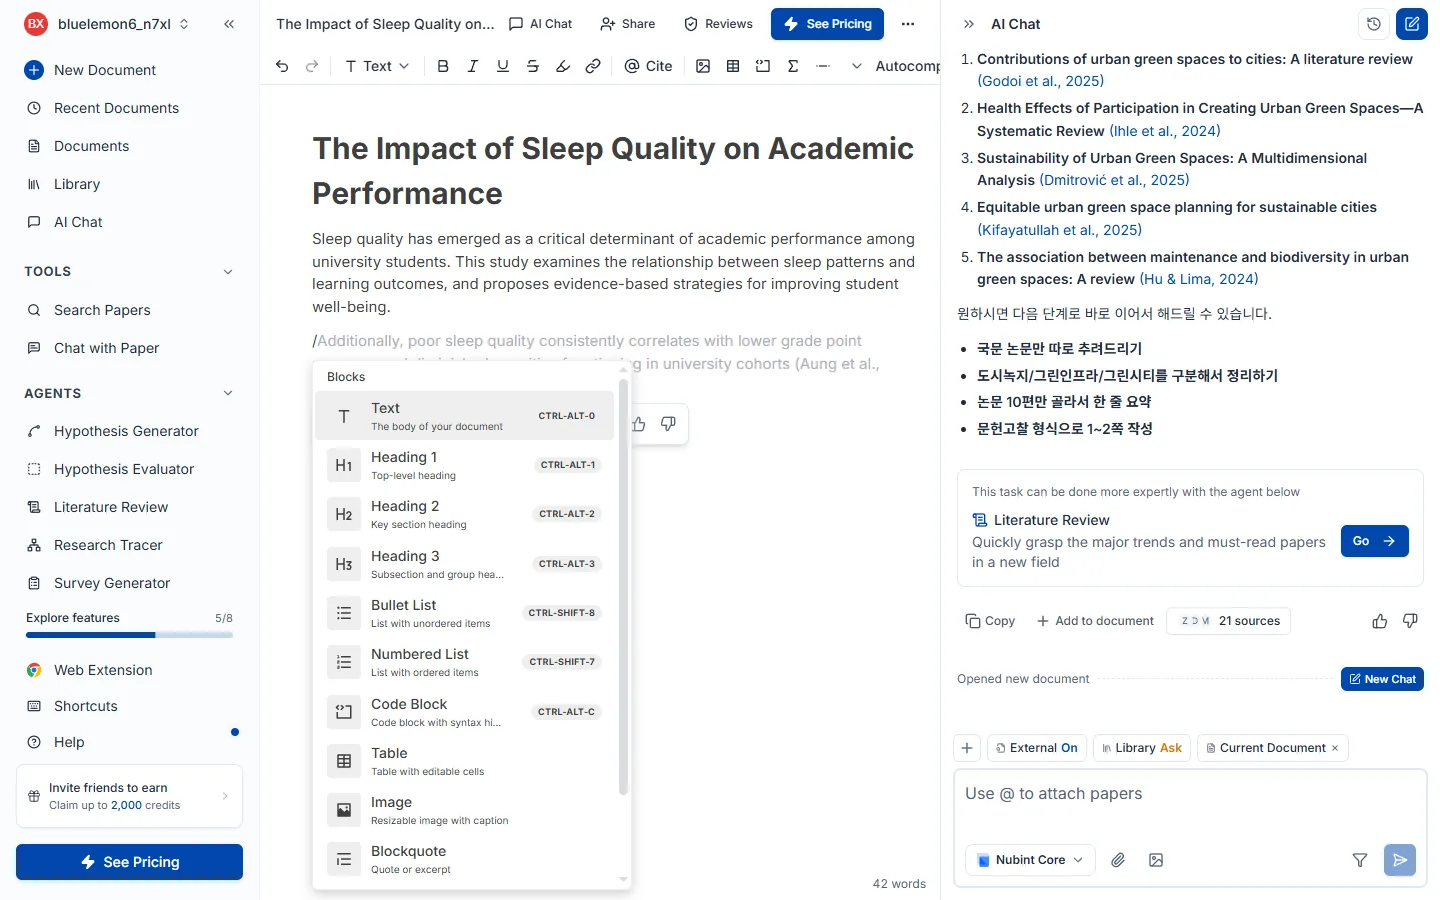
Typing / in the editor opens the slash menu. You can insert headings (H1~H3), bulleted and numbered lists, tables, code blocks, equations (KaTeX), blockquotes, and dividers.
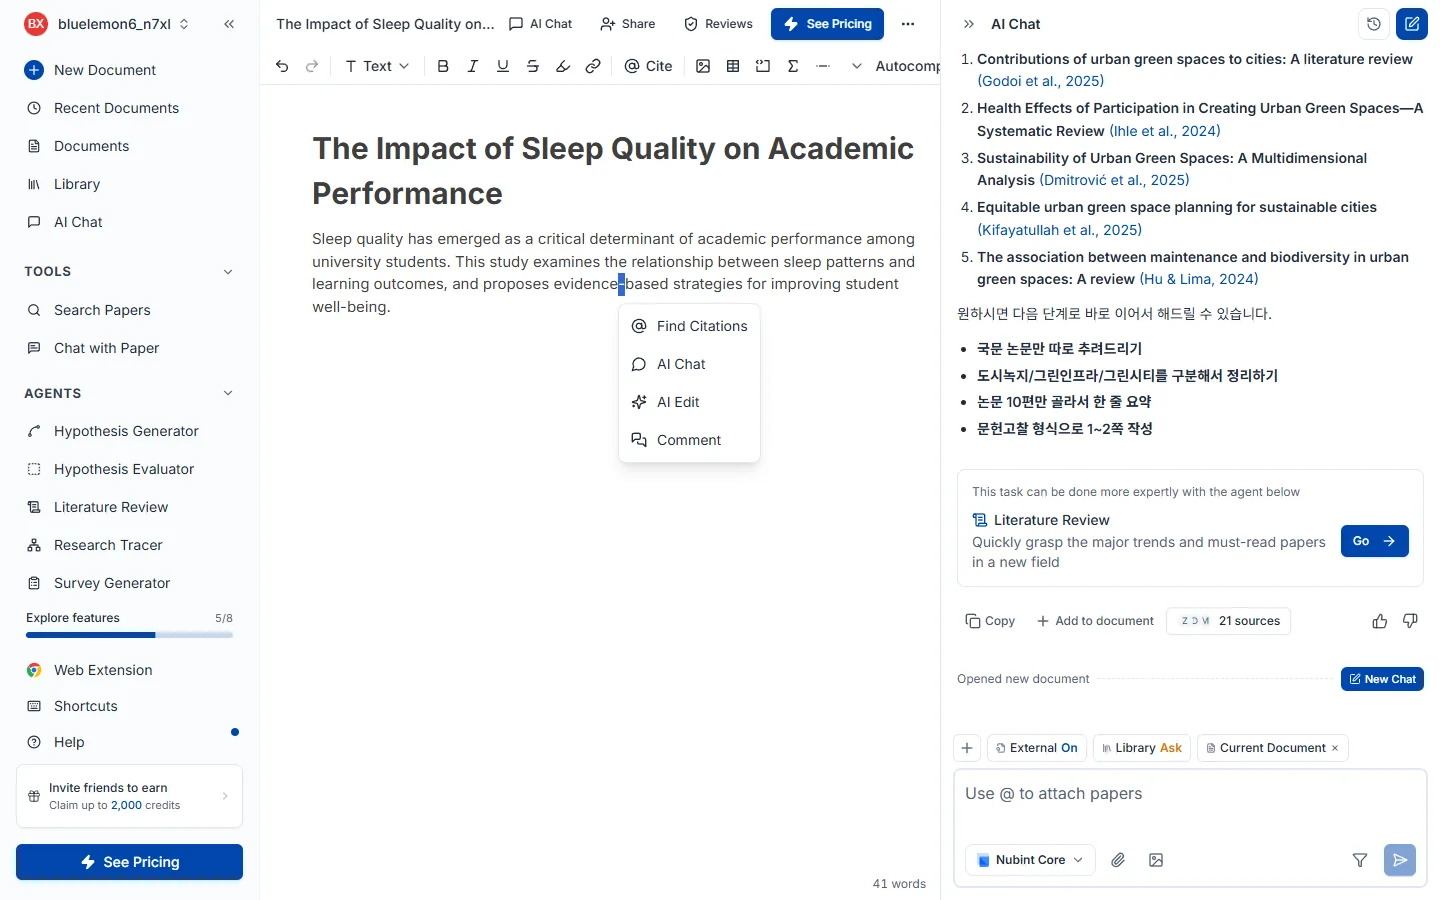
Dragging over text brings up the formatting toolbar, with bold, italic, underline, strikethrough, inline code, links, and highlight. Italics are the convention for technical terms and variable names.
Change it from the style setting beside the reference list in the editor, or from document settings in the top header. Changing the style updates every citation already inserted in the document, so there is nothing to fix by hand.
Citation styles come from the Citation Style Language (CSL) project. Thousands of formats — APA, MLA, Chicago, Vancouver, Nature and more — are provided open source in the CSL Style Repository under the CC BY-SA 3.0 license.
From the more menu at the top of the editor you can export to Word (.docx) and LaTeX (.tex), or copy the body to the clipboard.
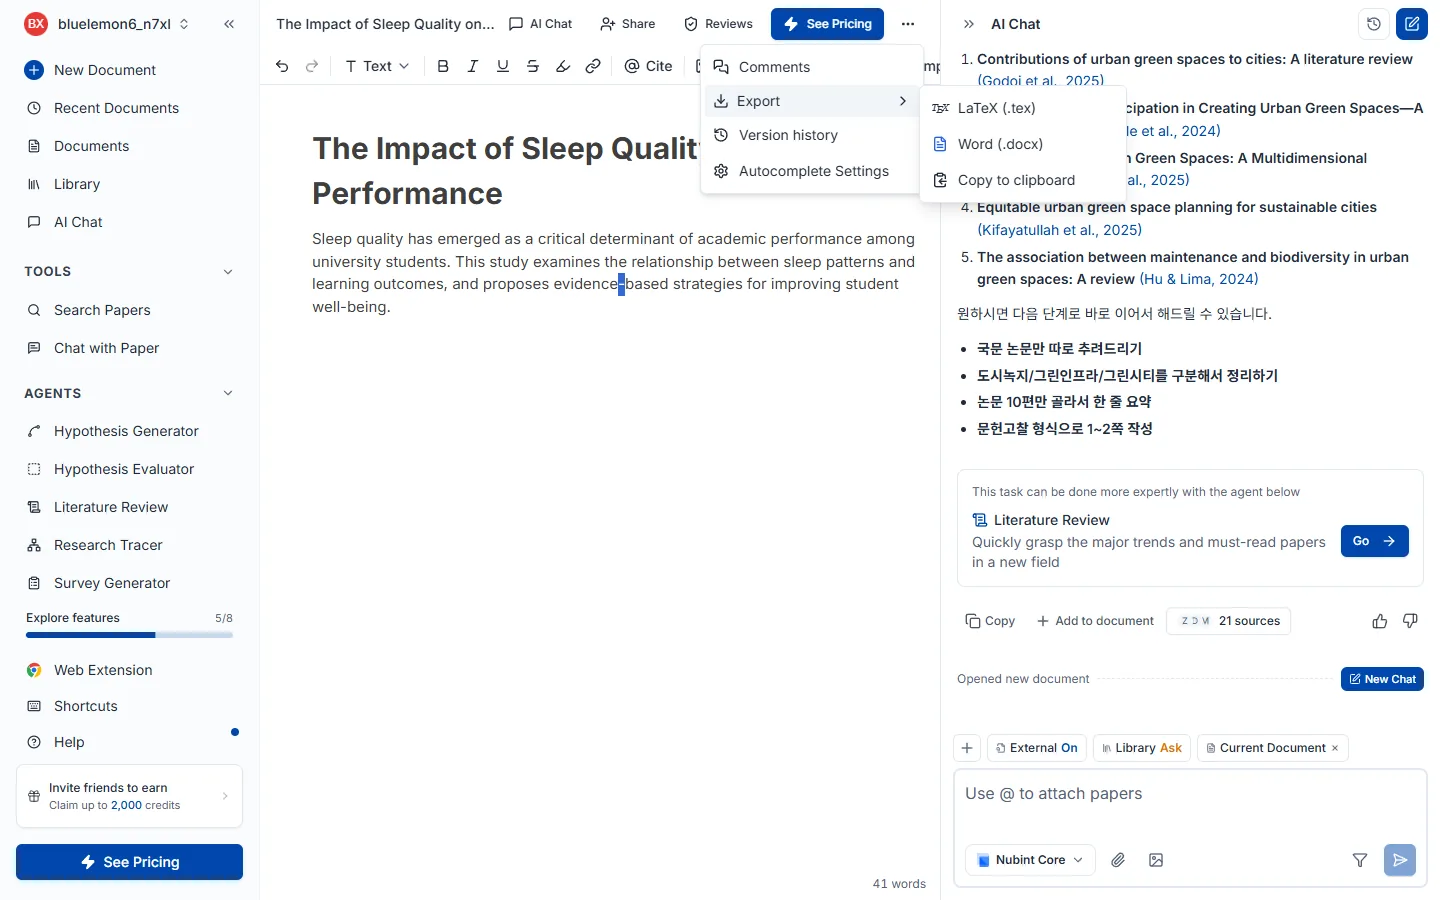
The free plan exports the body only; Pro and Max export the body together with references.
For when you stall mid-paragraph and want the next sentence with its citation already attached. It does not write a sentence and look for a source afterwards — it finds the supporting paper first, then writes a sentence that matches it.
Put your cursor at the end of a paragraph and the input opens (Ctrl + / opens it directly). Describe how to continue and press Enter, or pick a preset below, and it runs through finding sources → writing.
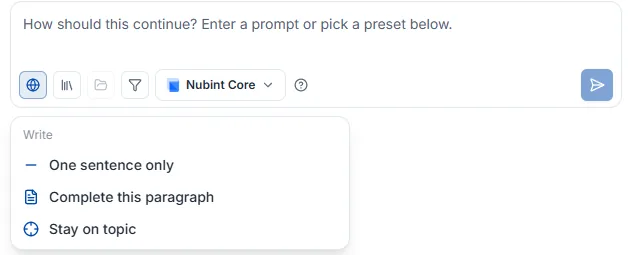
For example: continue with a sentence pointing out the limitation of the previous paragraph, or one sentence citing empirical work that supports this claim.
Presets let you pick a direction instead of writing an instruction, and run the moment you choose one. Only the writing group shows at first; the rest appear once a suggestion exists and you open Follow up, since they need something to revise.
One sentence only · Complete this paragraph (3~5 sentences) · Stay on topic (no tangents)Make it sharper (specifics instead of platitudes) · Simplify wordingRewrite without citations · Verify the evidence (does the cited content actually match) · Cite from my libraryWhere it looks for evidence is set in the control row below the input, shared with AI edit.
Suggestions appear in gray at the cursor.
Esc or move the cursor elsewhereAccepting and retrying happen only through the buttons on the result card — there is no accept shortcut, so arrow keys and Tab are never intercepted while you type.
Credits are charged per run against your credit balance, with no usage cap. You are charged at the moment you run it even if you do not accept (retries and follow-ups each count as a run), and nothing is charged if you cancel with Stop or Esc while it is working.
For revising sentences you already wrote. Unlike AI autocomplete, which adds new sentences, this rewrites what you selected.
Drag the text you want to change, click AI edit in the toolbar, then pick a preset or describe the revision in your own words and press Enter. While it runs, the progress steps (checking document citations → finding sources → refining) are shown, and it can only be stopped with the Stop button — clicking outside will not close it mid-run.
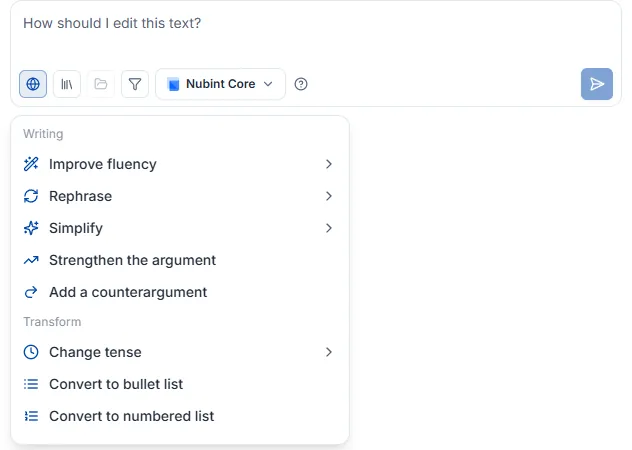
Where it looks for evidence (web search, library, collections, filters, model) is shared with AI autocomplete. For edits that need no evidence — translation, list conversion — turning web search off is faster.
Presets come in three groups. Items with sub-options expand sideways on hover (on mobile, tapping switches the list in place).
Improve fluency (fix flow / add transitions / remove redundancy) · Paraphrase · Simplify · Strengthen argument · Add counterargument. Paraphrase and simplify let you choose a tone: academic · casual · persuasive · bold · friendlyChange tense (past/present/future) · To bulleted list · To numbered list · To prose · To table · Translate (Korean · English · Spanish · German · French · Chinese · Japanese)Increase formality (colloquial to academic register) · Technical precision (vague wording to exact terms) · Strengthen claim · Soften claim (overstatement into careful hedging)Choose how to apply the result on the result card.
To discard, press Esc or click outside the popover.
Credits are charged against your credit balance at cost. You are charged per run even if you do not apply the result (retries and follow-ups each count), and nothing is charged if you press Stop while it works. Scholar costs more than Core, and turning on web or library search adds the cost of finding evidence.
On the start screen of a new document, click Import from Docx and pick a .docx file to load its contents into the editor. Once imported you can use AI autocomplete, AI edit, and citation insertion right away.
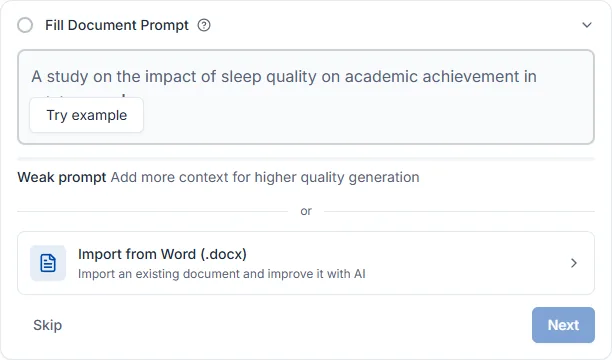
Only .docx is supported — .doc, .pdf, and .hwp are not accepted.
For attaching a paper you chose yourself to a sentence you already wrote. If you want the AI to find the evidence for you, AI autocomplete or Citation recommender is the better fit.
There are three ways in and the rest is the same — search the paper picker by title or keyword, choose one, and the citation is inserted at that spot.
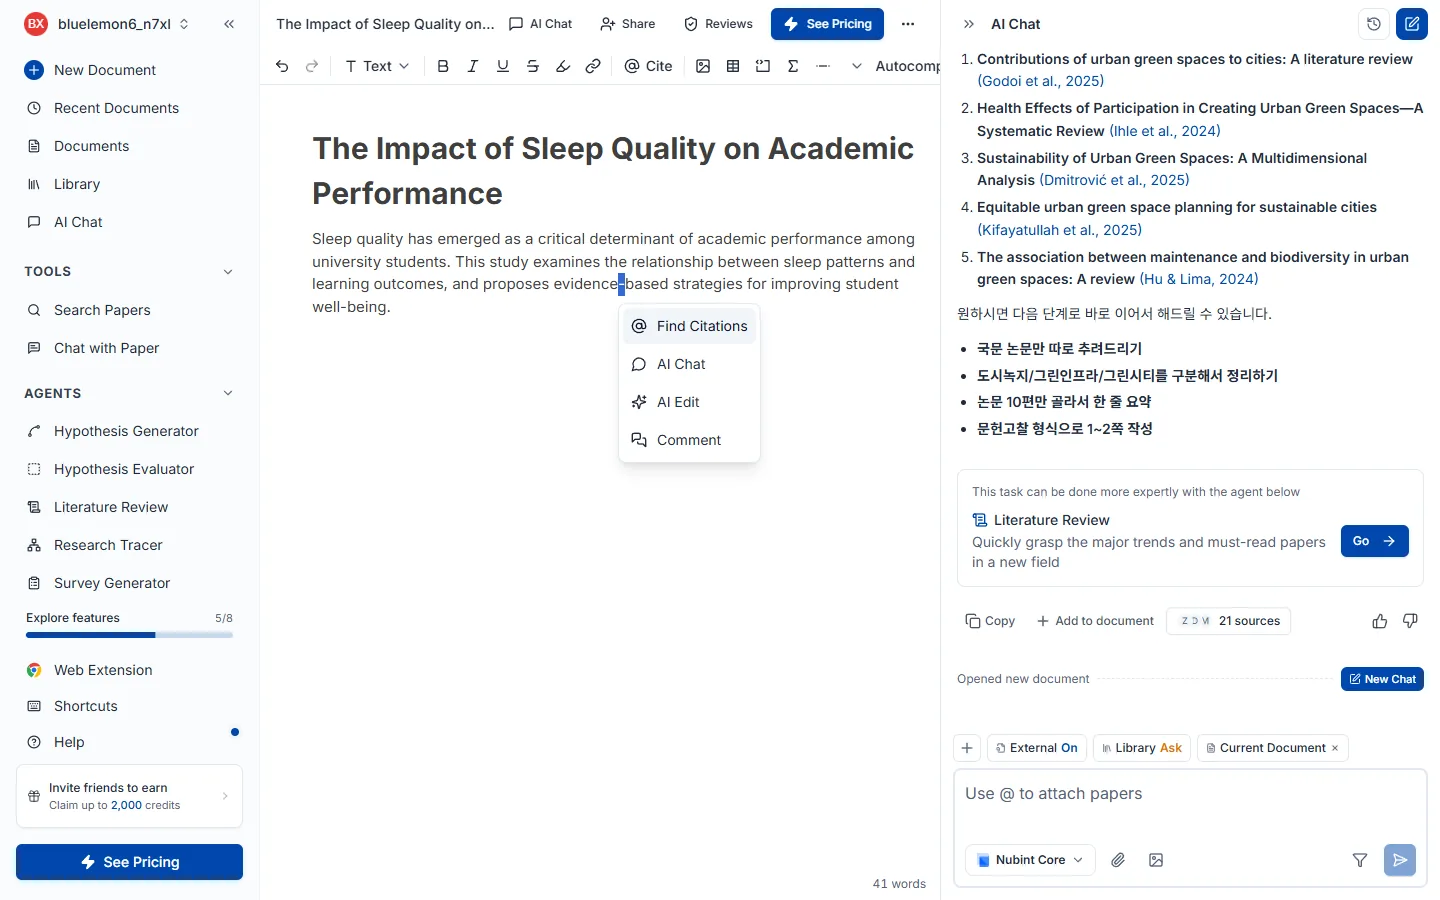
Typing @ where you want the citation is fastest. You can also place the cursor and click @ Cite in the top toolbar, or drag a sentence and click the cite button in the toolbar that appears.
Inserted citations are formatted to the style set on the document (APA, MLA, Chicago and so on) and added to the reference list at the bottom. To change the style, see Change citation style.
The five reviews never look at the same thing. Work down from structure (peer review) to evidence (claim credibility, source quality) to sentences (tone of voice, proofread).
Click Review at the top of the editor and the review panel opens on the right. The five reviews are listed as cards, and Run review on any card starts it. If you have run it before the button becomes View results, and after you edit the draft you can re-run it with the refresh icon at the top right of the results screen. The ? on each card opens that review's help. Opening the panel alone costs nothing.
The five reviews never look at the same thing. Working from the big picture down to the sentence is the efficient order — fixing structure rewrites sentences anyway.
| Review | What it looks at | When to run it | Free |
|---|---|---|---|
| Peer review | Structure, logic, methodology, citation depth | Once the draft is roughly complete | — |
| Claim credibility | Claims asserted without evidence | Once the draft has substance | ✅ |
| Source quality | The credibility of the papers you cited | Once citations are in | — |
| Tone of voice | Whether the overall register fits academic writing | When you start polishing | ✅ |
| Proofread | Grammar, spelling, punctuation, word choice | Last, once content is final | — |
Claim credibility and source quality are easy to confuse. Claim credibility asks whether evidence is attached; source quality asks whether the attached evidence is any good. A sentence with no citation at all is caught by claim credibility; a retracted or low-ranked citation is caught by source quality.
You can review part of a document. Set the scope with the settings icon on a card and only that part is checked — useful for re-checking a passage you just edited in a long manuscript. Peer review is the exception: it always runs on the whole document, because judging structure and logic from a few isolated paragraphs is meaningless.
The results screen shares the same skeleton across every review. Expand N steps completed to see which checks ran, and Result summarizes the run in a paragraph (the 👍👎 beside it lets you rate the quality). Review changes walks you through findings one at a time, Detailed analysis breaks them down by category (a check mark means nothing was flagged in that category), and All suggestions shows the total. Click an underlined passage in your text to see what the problem is and choose Apply / Dismiss. At the bottom, Try next recommends which review to run after this one.
Each review adds one thing of its own on top — peer review contributes Overall assessment scores and comments, source quality contributes Bibliography notes, and tone of voice contributes Selected preset.
Credits are charged as A4 pages × a per-review rate, because a review reads the whole document and cost scales with length.
| Review | Credits per A4 page |
|---|---|
| Peer review | 6 |
| Claim credibility | 5 |
| Proofread | 3 |
| Source quality | 3 |
| Tone of voice | 3 |
One A4 page is roughly 2,000 CJK characters or 500 Latin words, counted separately and added together for mixed text. A minimum of 5 pages applies, so even a few lines are billed as five. If you scope the review to part of the document, only that part is counted. For example, peer review on a 10-page document costs 60 credits.
Check your remaining credits under Credits and quotas, and plan differences on the pricing page.
Looks at structure and logic. It reads the whole document along four axes — paper structure, logical flow, methodological soundness, and whether citations are sufficient — and leaves the kind of comments a journal reviewer would. How to run it and how credits work are covered in Getting started with reviews.
Run it once your draft is roughly complete. Getting the big picture right first saves you from editing sentences twice, so we recommend it as the first of the five. Sentence-level wording is Proofread's job, and whether claims have evidence is Claim credibility's. Even if you set a review scope, peer review always runs on the whole document.
Unlike the other reviews, the score comes first. Overall assessment rates validity, presentation, and contribution out of 4 each and produces a combined score out of 10, so read the axis scores to find the weak spot and then work down the Weaknesses list.
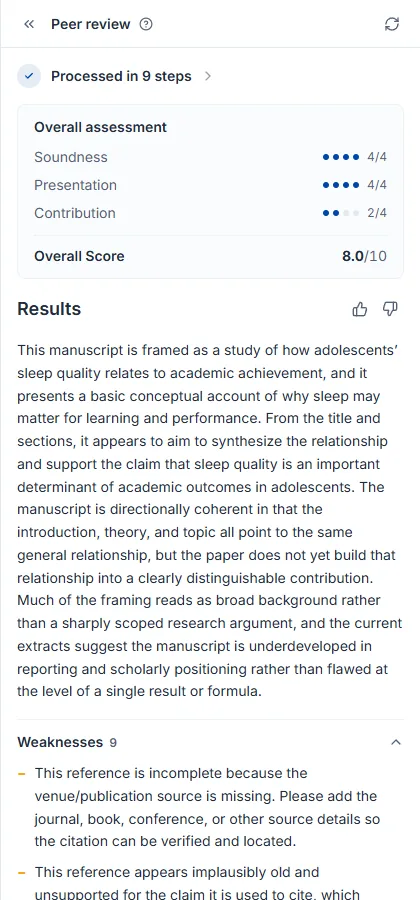
Findings arrive as comments in your document. Rather than the popover apply/dismiss flow of the other reviews, a reviewer comment is attached beside the sentence in question. Open a comment, read the point, edit the text yourself, then Resolve it to drop it from the list; re-running after edits adds new comments. Unresolved comments N on the results screen matches the badge on the list card, and when the badge hits 0 you have handled everything flagged in this round.
Looks at sentence-level wording only. It catches grammar, spelling, punctuation, and word choice sentence by sentence and proposes a rewritten version — particularly useful for tightening the academic register of an English draft. How to run it and how credits work are covered in Getting started with reviews.
Run it once the content is settled. If paragraphs are still going to change, later is better. The skeleton of the piece is Peer review's job, and whether the register fits academic writing is Tone of voice's. If you plan to run both, match the tone first and finish with proofreading — changing tone rewrites sentences.
Fixes are marked directly in your text: a red strikethrough is the original, green is the rewrite. Click an underlined passage and choose Apply / Dismiss.
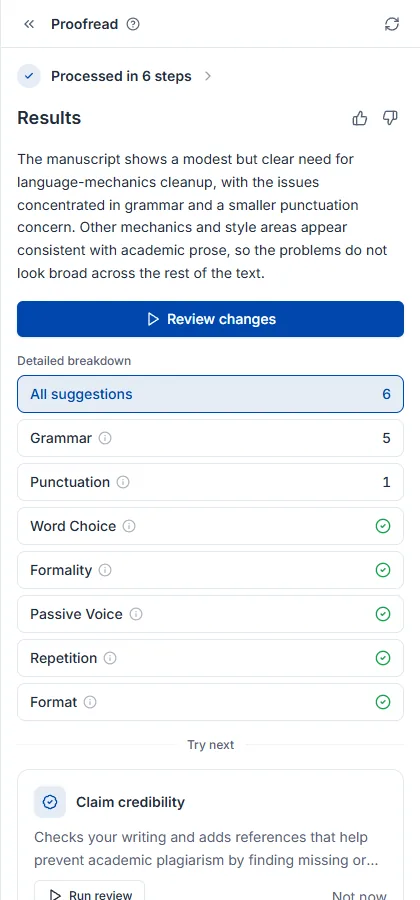
The full proofreading process is covered in the how to proofread a paper guide.
Looks at whether evidence is attached. It finds claims asserted without support and passages where the citation is weak, telling you why each is a problem and what kind of evidence it needs — so you use it to shore up citations and reduce plagiarism risk. Available on the free plan; how to run it and how credits work are covered in Getting started with reviews.
Run it once your draft has some substance. The quality of the citations that are attached (retractions, preprints, and so on) is Source quality's job, and to actually fill a flagged sentence with a real citation, use Citation recommender.
Under-supported sentences are marked in your text, categorized as miscited, contradicted by evidence, no evidence, weak evidence, overstated, or source unavailable. Click an underlined passage to see the problem and choose Apply / Dismiss.
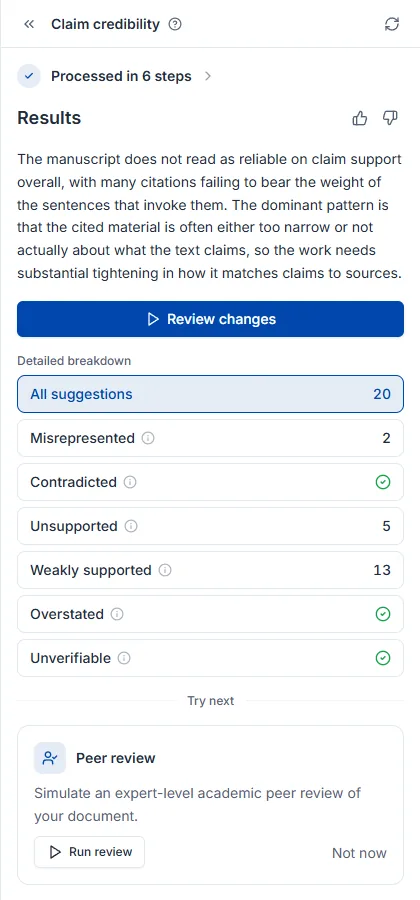
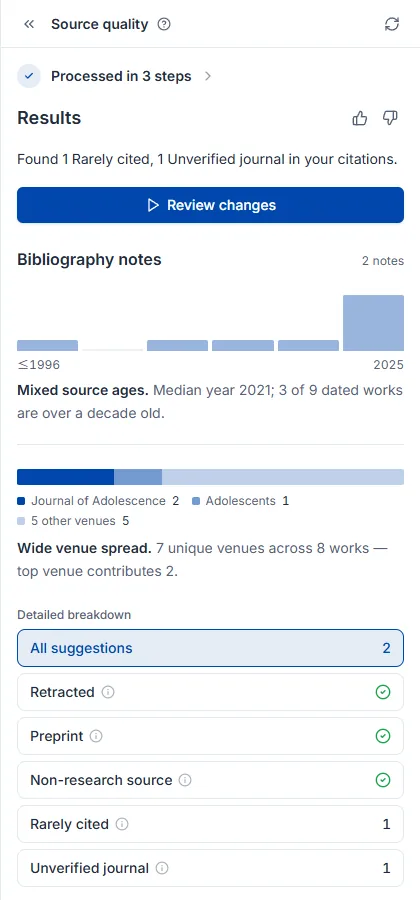
Looks at the cited papers themselves. It finds retracted papers, preprints that have not been peer reviewed, and low-ranked journals, so you do not have to vet a reference list by hand. How to run it and how credits work are covered in Getting started with reviews.
Run it once you have added some citations — with no citations there is nothing to check. Claims with no citation at all are found by Claim credibility, and replacements for problematic citations can be found with filters in Paper search.
What makes this review distinctive is that it reports the health of your whole bibliography, not just a finding count. On top of the shared result elements, Bibliography notes charts the year distribution and journal distribution of your references, so you can see at a glance whether the literature is dated or concentrated in one venue.
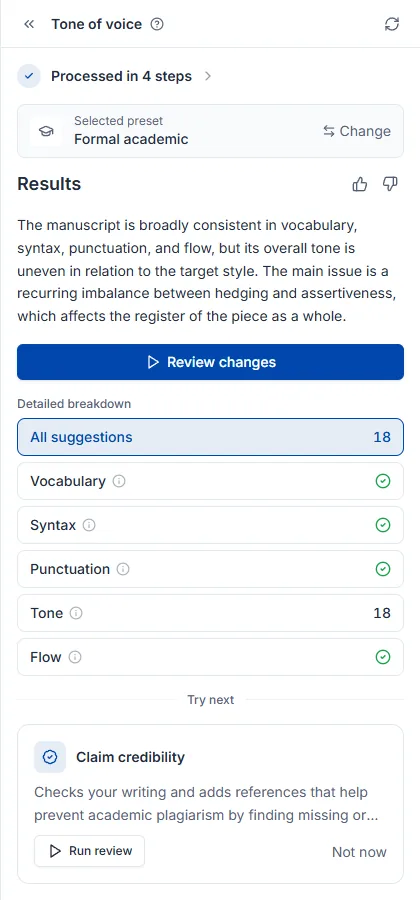
Looks at the register of the whole piece. It checks whether your draft reads like an academic paper and rewrites sentences that drift. Available on the free plan; how to run it and how credits work are covered in Getting started with reviews.
Grammar errors and typos are Proofread's job. If you plan to run both, match the tone first and finish with proofreading — changing tone rewrites sentences.
Setting the target register first matters. Use the settings icon on the card to pick a preset such as formal or concise, or point it at a paper in your library to match that paper's style. If you set nothing, it judges against general academic register.
The top of the results tells you which register it judged against. Different targets produce different findings, so start there. On top of the shared result elements, Selected preset shows what this run aimed for, and Change re-runs it against a different target.
They handle the stages before writing — forming and evaluating hypotheses, surveying literature, tracing a field's lineage, building surveys and citations. Each runs on its own page.
There are six, each run from its own page.
| Agent | What it does | What you give it |
|---|---|---|
| Hypothesis generator | Turns a topic into testable hypothesis candidates | A research topic, one sentence |
| Hypothesis evaluator | Scores a hypothesis you already have on four criteria | A hypothesis statement |
| Literature review | Gathers papers and writes a structured report | A topic to survey |
| Research tracer | Maps a field's lineage through the citation network | One seed paper |
| Survey generator | Builds survey items from validated scales | The hypothesis or topic to measure |
| Citation recommender | Finds citations that support the claims in your draft | Text you already wrote (2,500 chars) |
Expand the Agents group in the left sidebar and click one to go to its page. Type what that agent needs into the input, press its run button, and you move to a results page with step-by-step progress. If a task in AI chat would suit a particular agent better, a recommendation card appears in the chat and Go takes you to that page.
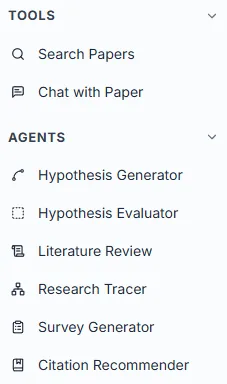
All six share the same screen layout: one input and a control row beneath it. See example fills in a sample when you are unsure what to write, and model offers Core (fast) or Scholar (best quality). Search filters exist only on literature review and citation recommender, narrowing reference papers by publication year, citation count, journal rank and so on. The run button is named differently per agent (Generate hypotheses, Start review, …) and Enter does the same thing.
While a run is in progress the send button becomes a stop button (■), and pressing it halts immediately. Partial results are not saved, and credits are charged only for what was actually used up to that point — you are not billed the full estimated cost.
Billing happens per run. The charge is whichever is larger, actual AI usage or the agent's minimum, so short runs cost little and heavy analysis costs more. Paper search does not consume credits — it is limited by a per-plan usage count instead — and the five reviews work on a different axis, charged by A4 page count. Check remaining credits under Credits and quotas, and plan limits on the pricing page.
Past runs are kept on each agent's page. They are stored separately from AI chat history, so a literature review run has to be found on the literature review page. Papers an agent collected go to your library, and drafts it wrote go to documents.
For when you have a topic of interest but no hypothesis in testable form yet. It builds hypothesis candidates grounded in 460M papers and attaches supporting papers to each. If you already have a hypothesis, go straight to Hypothesis evaluator.
Write your research topic in one sentence and press Generate hypotheses. It does not need to be a finished hypothesis — something like the effect of sleep deprivation on impulsivity in adolescents is enough. The screen layout and credits are covered in How agents work.
The result is a canvas, not a list. Hypothesis cards branch out from the topic you entered, one card per hypothesis.
Rather than expecting a finished hypothesis in one shot, pressing Refine on a card that nags at you and branching two or three times produces far more usable results. You can also branch in a direction of your own with + (for example, "from a policy intervention angle"), and the canvas keeps that exploration visible.
Click a card and the detail panel on the right opens with that hypothesis examined along five axes — overview, plausibility, novelty, feasibility, significance — alongside supporting papers. Every blue parenthetical citation in the text is a real paper, and Sources N at the bottom saves them to your library.
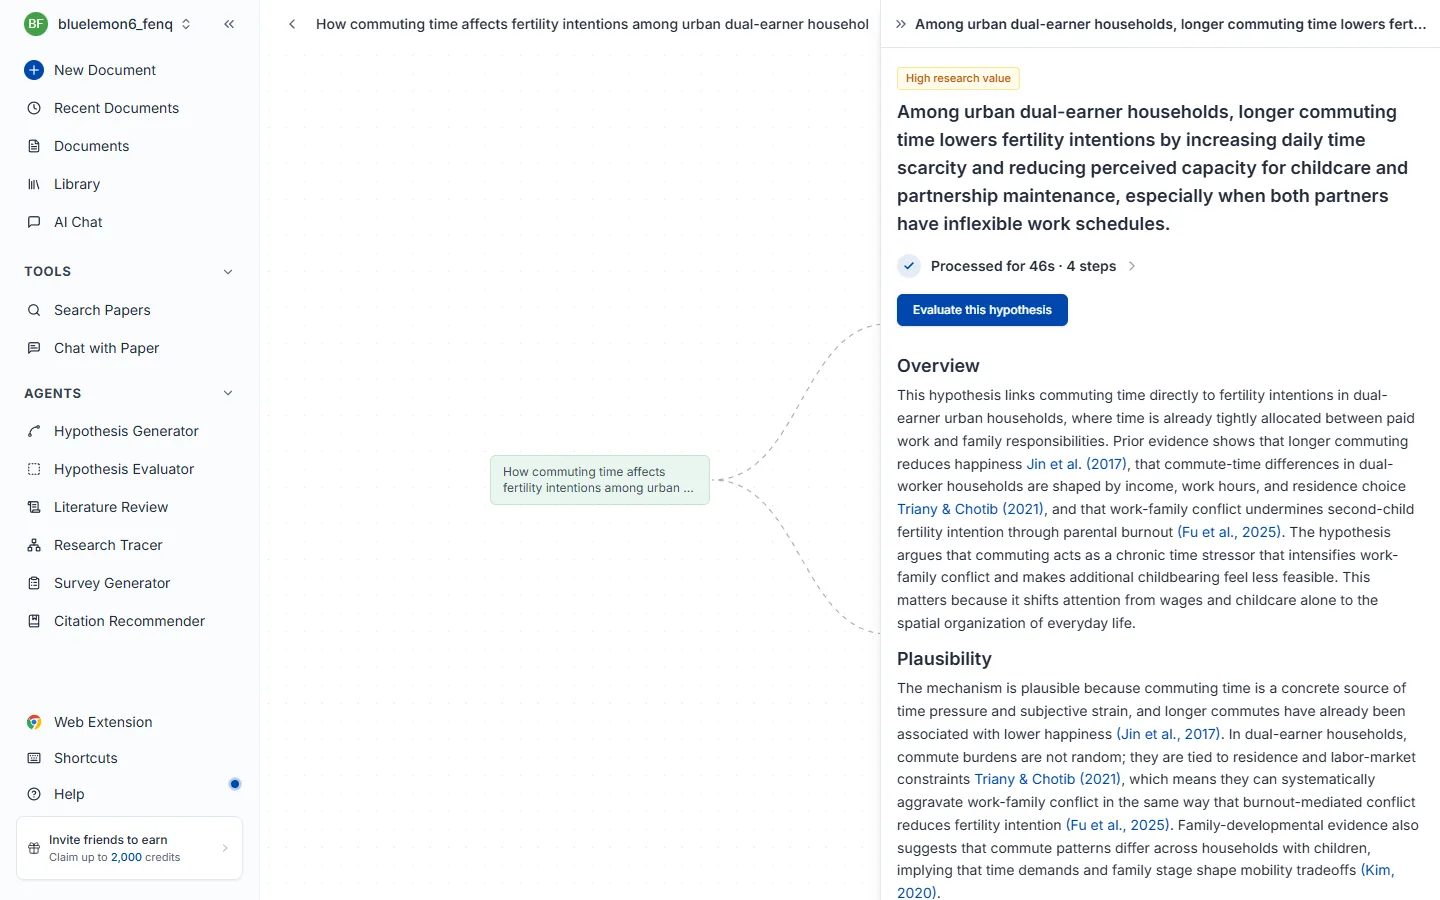
To get graded scores per criterion, hand it to Hypothesis evaluator with Evaluate this hypothesis.
For when you have a hypothesis and need to judge whether it is worth starting research on as it stands. It scores testability, originality, feasibility, and clarity, and tells you how to fix whichever criterion scores low. Originality is measured live against 460M papers.
Paste the hypothesis as it is and press Get evaluation. A single sentence works, and so does a longer statement with conditions and expected effects, such as not using a smartphone in the hour before bed on weekdays increases total sleep time by at least 20 minutes. The screen layout and credits are covered in How agents work.
Overall assessment at the top names the hypothesis's strength and biggest weakness in a paragraph, and each criterion below carries a grade and a one-line diagnosis. The N papers beside the title is how many papers it actually checked against.
Do not stop at the grades — expand More on whatever scored low. What is written there is not "what is missing" but "how to narrow it". If originality scores low, the topic has already been well covered; narrow the population, conditions, or measurement to create a distinction, then re-evaluate and watch the score move.
For when you need papers read and synthesized, not merely found. It gathers related work automatically, reads up to 40 papers in full, and organizes the major currents, methodologies, and open questions into a report with citations attached. If you only need to find things quickly, Paper search is the better fit.
Write the topic to survey in one sentence and press Start review. A sentence produces better results than a list of keywords — something like a study on the effect of sleep quality on academic achievement in adolescents.
Search filters constrain publication year, citation count, journal rank and so on. Filter by year to see only recent trends, or by citation count to see only well-established literature. It takes a while because of the volume analyzed, and can be stopped mid-run. The screen layout and credits are covered in How agents work.
The result is a readable report, not a list. The N papers beside the title is how many were actually analyzed.
Because every paragraph carries citations, you can copy a passage you like straight into your draft as scaffolding and just verify the citations. Blue (Author, Year) links go to the original, and Sources N at the bottom lets you pick papers to save to your library.
The full literature review process is covered in the how to conduct a literature review guide.
For when you need to know why a field developed the way it did, not just a list of recent papers. Starting from one seed paper it follows the citation network in both directions, up to five steps, and draws the lineage — useful for finding research gaps or laying out the narrative spine of a literature review.
Unlike the other agents, this one starts from a paper, not a topic. Search by title or author name, pick a seed, and tracing begins the moment you select it. A landmark paper in the field or a key paper you have read makes a good seed. The screen layout and credits are covered in How agents work.
The screen splits in two: the citation network graph on the left and the detail panel for the selected paper on the right. The green node is your seed, and edges are citation relationships — further left is older, further right is later work.
Follow the graph to the far left for the classics of the field, and to the far right for the newest work. That axis works directly as the ordering for a literature review narrative.
Clicking a node opens its bibliographic details and abstract on the right, where Research flow names the lineage that paper belongs to. Citation count and journal quartile (CITED BY / Q2) give you a sense of influence, and DOI and URL copy with the icon beside them.
For when you need to collect survey data but writing items from scratch feels daunting. It finds measurement scales already validated in published research and turns them into items — the point being that they are easier to defend than items you invented.
Write what you want to measure and press Generate survey. A hypothesis works, and so does a topic-level description such as stress factors and coping methods among office workers. The screen layout and credits are covered in How agents work.
You get a survey ready to field, not a rough set of items — everything from the introduction through the final question, with 10~30 items mixing Likert, multiple choice, and open-ended formats.
Download gives you a file to move into whatever survey tool you use. Before that, drop items that do not fit your research context and adjust the wording to your respondents.
For when the sentences are written but you cannot find papers to back them up. Paste your draft and it finds the 3~5 strongest supporting citations per claim and slots them straight into the sentences. Because it searches by meaning rather than keywords, it catches papers covering the same idea in different words.
Paste the sentence or paragraph that needs citations and press Generate citations. A single sentence works, so does a paragraph, up to 2,500 characters. Search filters constrain publication year, citation count, journal rank and so on — set them to match your target journal's standards. The screen layout and credits are covered in How agents work.
You get back your own draft, not a separate list, with (Author, Year) inserted where citations belong. Underlined sentences are the ones that received citations, so you can see at a glance what changed.
Copy takes the whole paragraph as it is, but check first that the cited passages actually match your claim.
To do this inside the editor, AI autocomplete writes sentences with citations already attached.
For finding papers quickly. It searches by meaning, so you do not need the exact academic term, and it is governed by a usage count rather than credits.
For when you just need to find papers quickly — picking something to cite, skimming what exists on a topic, or locating a specific paper by title. If you also need those papers read and synthesized, Literature review is the better fit.
Put keywords or a full sentence into the search box. Because it searches by meaning, you do not need the exact academic term to surface papers that match your intent.
transformer attention mechanism NLPcomparing pretrained model performance in text sentiment analysishow does data augmentation affect diagnostic accuracy in deep-learning medical imaging?Results come back ranked by relevance within seconds. Because they are drawn only from a verified academic database, no non-existent papers slip in. To narrow results see Search filters, and to read the cards see Reading results.
No credits are charged. Paper search is governed by a per-plan usage count rather than credits — three per day on the free plan, unlimited on paid plans. Check what is left under Credits and quotas.
Click the filter icon to the right of the search input to open the filter panel. Choose conditions and press Apply to narrow results; Reset clears everything. It exists to cut 460M papers down to the ones that fit your research.
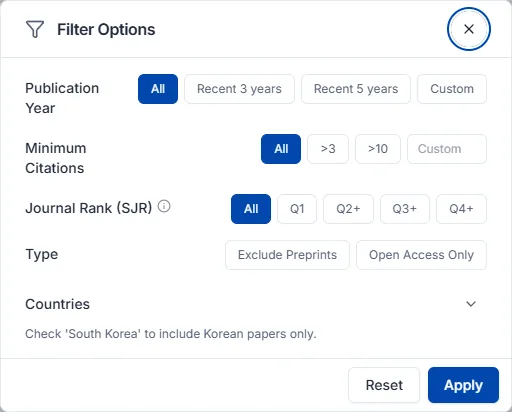
Journal rank (SJR) measures a journal's influence, weighing both citation counts and the authority of the citing journals. Choose Q1 or Q2+ when looking for a journal to submit to, or when your citations need stronger backing.
| Option | Meaning |
|---|---|
| Q1 | Top 25% — highest-quality journals in the field |
| Q2+ | Top 50% |
| Q3+ | Top 75% |
| Q4+ | All journals with an SJR rating |
| No filter | Rank is ignored |
By situation:
| Your situation | Suggested combination |
|---|---|
| Quickly scan the latest trends | Publication year, last 3 years |
| Learn the foundational papers first | High minimum citations + journal rank Q1 |
| Pick papers I can actually cite | Exclude preprints + journal rank Q2+ |
| Read the full text right now | Open access only |
| Look at research from a specific country | Country filter |
| Results include papers from other fields | Set field of study |
The more filters you stack, the narrower the results. If too few papers come back, relax the strongest conditions first — journal rank Q1 and high citation counts.
A paper card carries the title, authors, and publication details (journal, year, volume) along with three indicators you judge by.
Read relevance and citations together. High on both suggests core literature for your topic. High relevance with low citations may simply mean recent work or an emerging area — that is not a bad sign. When you need a quick scan, start with open access so nothing stands between you and the text.
Full text opens along one of three paths depending on the paper's availability.
Papers worth keeping can be saved to your library, where they become available for chat and citations.
Where the papers you collect live. What sits here becomes reference material for chat and the source of your citations. Fill it from search, the extension, or Zotero, and organize it with collections.
Click the save button on a paper card in paper search results to add it to your library.
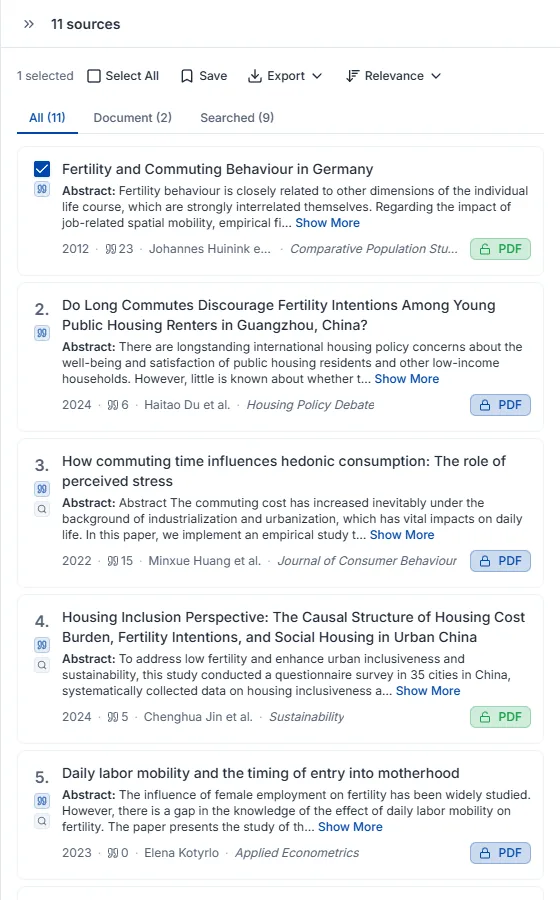
Saved papers appear in the library panel on the left, where you can sort them into collections or narrow them with filters.
The Import button in the library panel offers two routes.
If you use Zotero, connecting the account is the better option.
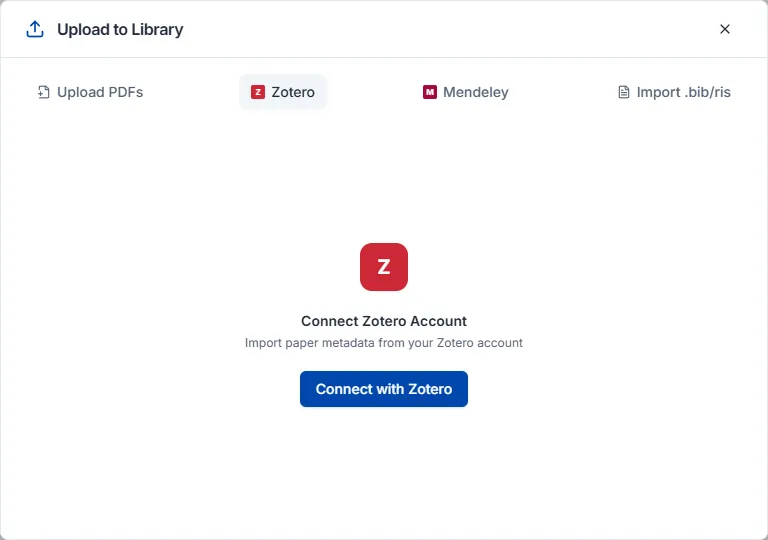
To connect an account, choose Import → Connect Zotero account and sign in with Zotero; your existing collections transfer automatically.
File upload supports RIS, BibTeX, and CSV. Export the papers you want from your current reference manager as RIS or BibTeX and upload the file. This works for files exported from EndNote, Mendeley, and other tools, not just Zotero.
With a paper page open, click the Nubint Web Importer icon in your browser toolbar and the title, authors, journal, and DOI are detected automatically. Pick a destination — My Library or an existing collection — and press Add to save it. Papers already saved show as "In library".
Install it by searching for Nubint Web Importer in the Chrome Web Store; the same extension works in Microsoft Edge. After installing, click the icon and sign in with your Nubint account to sync the library and collections you use on the web.
It works on most paper pages that expose standard citation metadata — Nature, PubMed, arXiv, ScienceDirect, and Springer among them. If a paper is not detected you will see "No reference detected"; try again from the abstract or detail page (a DOI, arXiv, or PubMed link).
Saving costs no credits. It only pulls bibliographic data across — no AI analysis or summarization is performed.
Create one with the New collection button at the top of the library panel. Nesting a collection inside another gives you a hierarchy.
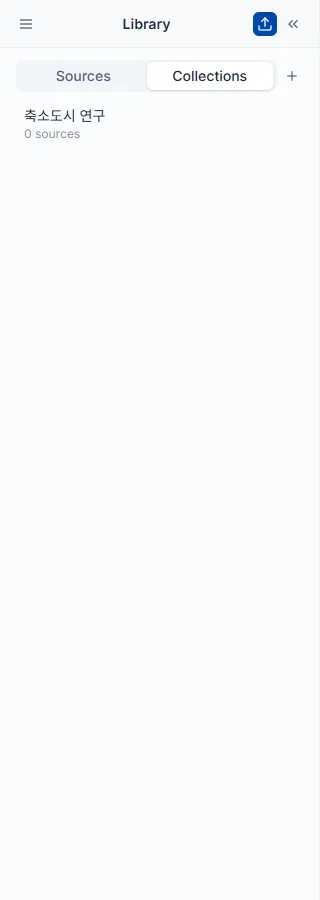
Add papers with the Add to collection button on a paper card, or select several papers and add them at once. A paper can belong to several collections at the same time, which makes cross-classification possible.
Hovering over a collection name reveals edit options for renaming and deleting. Deleting a collection leaves the papers themselves in your library.
Tick the checkboxes on paper cards to select several at once; the count appears at the top along with the bulk action options.
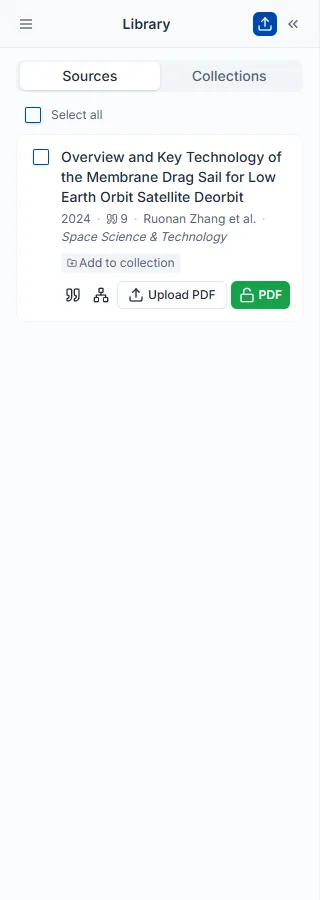
Click Filter at the top of the library panel and choose your conditions. Stacking filters narrows the range further.
The options largely match the search filters, but these narrow only within papers you already saved.
Click Export in the library panel and choose a format to download the file. Ticking the checkboxes on specific paper cards first exports only those.
Changing plans and payment methods, plus how credits and quotas are charged and when they reset.
You can change it at any time. Go to profile → Settings → Subscription tab, press Change plan, pick a plan and billing cycle, and review the details on the checkout page.
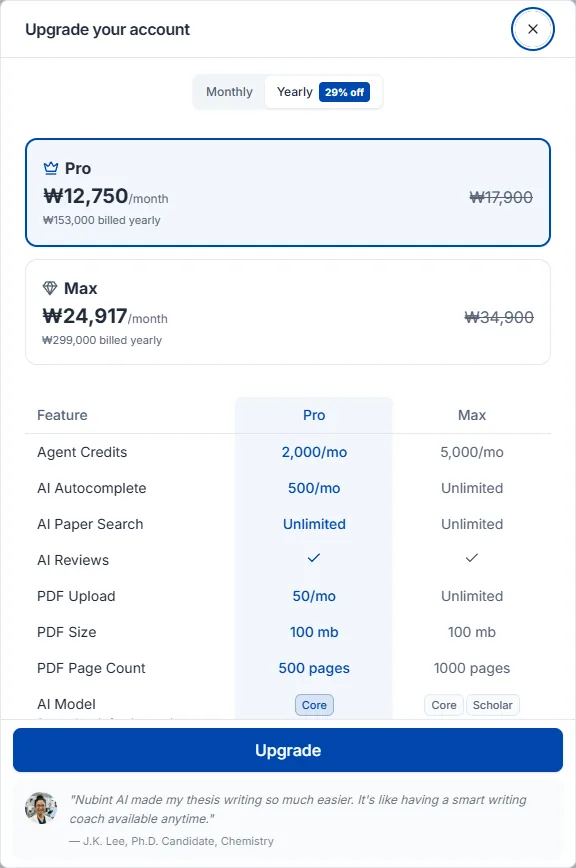
Upgrades apply the moment payment completes. The remainder of your current cycle is prorated against the new plan's cost, and the exact amount is shown on the checkout page beforehand.
Downgrades apply from your next billing date, and you keep the current plan until then. No payment is taken when you request one; the new plan's cost is billed on the next date. Before that date you can undo it with Cancel downgrade in the Subscription tab, which leaves your current plan to renew as usual.
Feature and price comparisons for Free, Pro, and Max are on the pricing page. Switching to annual billing applies a discount.
Go to profile → Settings → Subscription tab, press Cancel subscription below your current plan details, and confirm.
Cancelling leaves the period you already paid for intact. You keep every Pro or Max feature until the current billing cycle ends, after which the account switches automatically to the Free plan. Saved papers, your library, and documents in progress all remain. No automatic payment is taken for the following cycle.
Your payment method is registered automatically when you choose one at checkout for your first paid subscription. There is no separate registration step.
Which payment methods are available depends on the country you pay from. Alongside credit and debit cards, the checkout may show Apple Pay, Google Pay, PayPal, and local methods such as iDEAL or Pix.
To change it, go to profile → Settings → Subscription tab and press Change payment method in the payment method area. Save the new method at checkout and the change takes effect immediately, with your next billing cycle charged to the new method.
When you change your payment method, the checkout shows a zero amount. This is a verification step, and nothing is actually charged.
The method currently on file is shown in the same place, for example as Visa •••• 1234, or as PayPal if that is what you use.
If your card is nearing expiry, swap it in advance so billing is not interrupted. Your active subscription is unaffected.
Click the profile area at the top left to see your remaining credits and per-feature quotas at a glance.
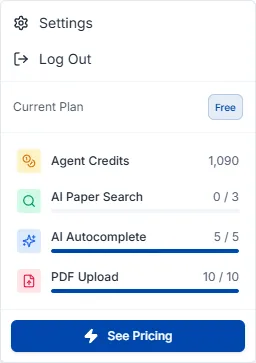
Credits are charged by actual AI usage rather than a fixed number of runs. A short question costs little; a large literature analysis costs more.
Quotas are usage counts applied to paper search and PDF upload. These two consume no credits and are governed purely by counts, which differ per plan. Both are unlimited on the paid plans (Pro and Max), so the profile area shows only your remaining credits there — no quota rows.
Credits reset on your monthly renewal date; quotas reset daily or monthly depending on the feature and plan.
Paid plans (Pro and Max) can top up in units of 1,500 credits when the monthly allowance runs short. Go to profile → Settings → Subscription tab → Buy credits, where you can purchase up to 15,000 credits at a time at $10 per 1,500 (shown in local currency where applicable). A payment method is required, and the free plan cannot top up.
Purchased credits are valid for six months from the date of purchase. They are consumed in the order bonus credits → purchased credits → monthly credits, and among purchased credits the ones expiring soonest go first.
Turning on auto-charge tops up 1,500 credits ($10) automatically whenever your balance falls below 500, so work is not interrupted by running out mid-task. Toggle it in the buy-credits area of the Subscription tab; it requires a paid plan and a registered payment method.
Go to profile → Settings → General/Profile tab at the top left, press Delete account, and confirm with Delete.
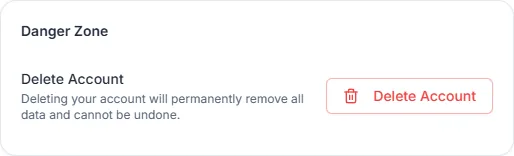
If you have an active paid subscription, cancel it first and then delete the account.
Within 14 days of payment and provided you have not used the credits that payment granted, you receive a full refund. Once credit usage has begun, delivery of digital content is considered to have started and refunds are restricted.
Renewal payments and mid-term cancellation of an annual subscription are not refundable. If you do not want to renew, stop automatic renewal before the renewal date via Cancel subscription — cancelling still leaves you access until the end of the period you already paid for.
Send refund requests to contact@nubint.ai.
How to reach us when you cannot find the answer here.
Send questions and feature suggestions to contact@nubint.ai.
We also post updates on social media — X (Twitter) · Threads · Instagram · Facebook · LinkedIn · YouTube