[论文解读] FoundationPose-TensorRT
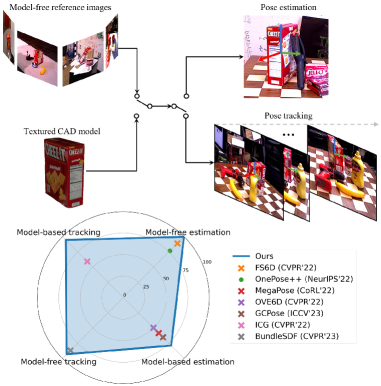
FoundationPose 是一个用于新对象的 6D 姿态估计与跟踪的统一基础模型,适用于模型驱动和无模型两种设置,具备神经隐式表示和大规模合成数据以在无微调的情况下实现测试时泛化。
TensorRT-accelerated 6DoF object pose estimation and tracking based on FoundationPose. Given an RGB-D image, a 3D mesh of the object, and an initial segmentation mask, the model estimates the object pose and tracks it across subsequent frames. Credits The core inference code is derived from tao-toolkit-triton-apps, with the heavy Triton Inference Server dependencies removed and replaced by a direct TensorRT backend. The ONNX models are provided by isaac_ros_foundationpose. Setup 1. CUDA and TensorRT dependencies Install CUDA 12.4 + cuDNN 9.8 and TensorRT 10.9.0 into a local `deps/` folder: source scripts/deps.shactivate_deps This downloads and installs the dependencies locally - no system-wide installation required. The environment variables (`CUDA_HOME`, `TENSORRT_HOME`, `PATH`, `LD_LIBRARY_PATH`) are only active in the current shell session. Run `deactivate_deps` to restore the original environment. To use a different CUDA or TensorRT version, edit `scripts/deps.sh`. Make sure the PyTorch CUDA version matches (see step 2). 2. Python environment Create and activate a Python environment, e.g. with conda: conda create --name fp_tensorrt python=3.10conda activate fp_tensorrt Then install all Python dependencies (requires `activate_deps` to be active): source scripts/deps.sh && activate_depsbash scripts/setup.sh This installs PyTorch 2.5.0 (CUDA 12.4), nvdiffrast, pytorch3d, TensorRT Python bindings, and other required packages. 3. Model compilation Download the ONNX models from NVIDIA NGC and compile them into TensorRT engine files: bash scripts/convert_onnx.sh This produces weights/tensorrt/refiner_cs252.plan and weights/tensorrt/scorer_cs252.plan. chunk_size variable inside convert_onnx.sh controls the maximum batch size of the TensorRT engines (default: 252). A smaller value reduces VRAM usage, which is useful when tracking multiple objects simultaneously or on memory-constrained GPUs. To change it, edit the chunk_size variable before running and use the matching value in FoundationPoseWrapperConfig. Usage Demo Run the benchmark on the YCB mustard bottle sequence (demo data is downloaded automatically): source scripts/deps.sh && activate_depspython demo.py This runs initial pose estimation on the first frame and tracks the object across the remaining frames, printing per-frame poses and mean inference times. Python API from foundationpose_tensorrt import FoundationPoseWrapper, FoundationPoseWrapperConfig cfg = FoundationPoseWrapperConfig( downsample_width=None, # Set e.g. to 256 for faster inference at lower accuracy est_refine_iter=5, # Refinement iterations for initial pose estimation track_refine_iter=2, # Refinement iterations for tracking chunk_size=252, # Must match the `chunk_size` of the compiled TensorRT engine)wrapper = FoundationPoseWrapper(cfg=cfg) # Set camera intrinsics (3x3 numpy array)wrapper.set_camera_intrinsics(K) # Load object meshmesh = FoundationPoseWrapper.load_mesh("path/to/mesh.obj") # --- First frame ---wrapper.reset_scene(color, depth) # color: (H,W,3) uint8, depth: (H,W) float32 in meterspose = wrapper.add_object("object_name", mesh, mask) # mask: (H,W) bool # --- Subsequent frames ---poses = wrapper.step_scene(color, depth) # returns dict[name -> (4,4) numpy array] # Visualizevis = wrapper.render_results() # returns BGR image with projected bounding box and axes Poses are returned as 4x4 homogeneous transformation matrices (object-in-camera frame). Project structure scripts/ deps.sh # Install/activate CUDA, cuDNN, TensorRT locally setup.sh # Install Python dependencies convert_onnx.sh # Download ONNX models and compile to TensorRTsrc/foundationpose_tensorrt/ wrapper.py # High-level FoundationPoseWrapper API model.py # TensorRT engine wrapper and FoundationposeModel postprocessor.py # Rendering, cropping, and pose utilitiesweights/ onnx/ # Downloaded ONNX models tensorrt/ # Compiled TensorRT .plan filesdemo.py # Benchmark on YCB mustard data
研究动机与目标
- 在多样场景中推动对未见对象的鲁棒 6D 姿态估计与跟踪。
- 开发一个同时支持模型驱动和无模型测试时设置的单一框架,适用于新对象。
- 通过合成数据生成、大规模训练以及统一的架构设计实现强泛化。
- 通过神经隐式对象表示实现新视图合成,弥合模型驱动与无模型之间的差距。
提出的方法
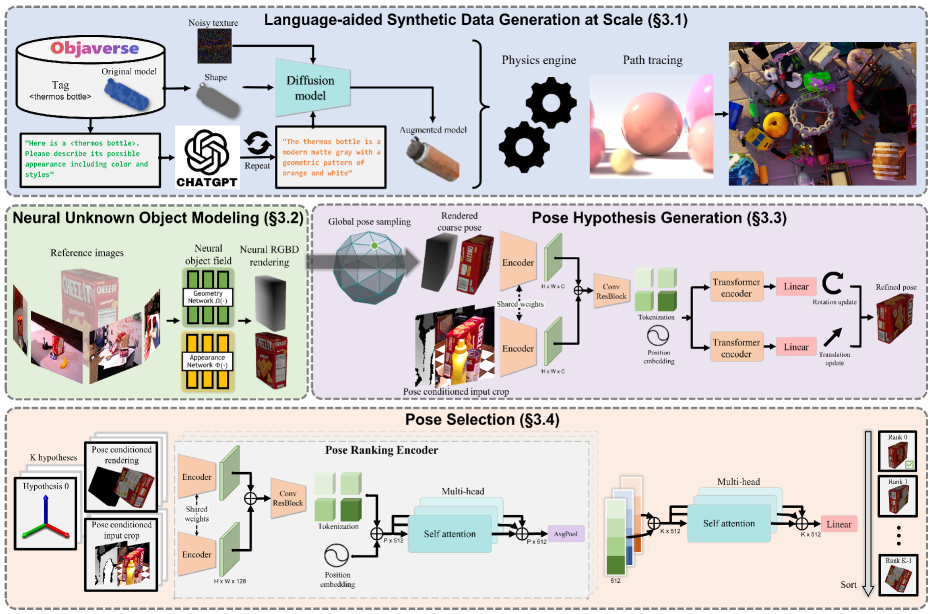
- 引入面向对象的神经隐式(基于 SDF)对象场用于 RGBD 渲染。
- 使用 LLM 与扩散模型辅助的纹理增强来多样化合成纹理。
- 训练一个基于变换器的姿态细化网络,用于更新从渲染视图得到的粗略姿态假设。
- 实现一个包含分层姿态比较和对比排序损失的姿态选择模块。
- 在测试时用少量参考视图进行推理以渲染并评估姿态假设。
- 提供与模型无关的渲染,作为对传统图形管线的就地替代。
实验结果
研究问题
- RQ1单一统一框架是否能够在模型驱动和无模型两种设置下完成新对象的 6D 姿态估计与跟踪?
- RQ2神经隐式对象表示是否能够实现有效的新视图合成与鲁棒姿态估计,适用于多种对象和纹理?
- RQ3在无需微调的前提下,合成数据在多大程度上可以借助 LLM 和扩散模型对未见对象实现泛化?
- RQ4分层姿态比较与对比排序在选择准确姿态方面能带来哪些好处?
主要发现
- 提出的 FoundationPose 框架在为每个任务专门化的方法(姿态估计或跟踪、模型驱动或无模型)上具有更优性能。
- 该方法在实例级方法的竞争性结果下实现了较强的鲁棒性,同时在对新对象不进行微调的情况下工作。
- 神经对象场使 RGBD 渲染高效并能有效评估姿态假设,桥接模型驱动与无模型设置。
- LLM 与扩散辅助的纹理增强显著提升了合成训练的数据多样性,从而改善泛化。
- 一个具备姿态条件裁剪和分层姿态排序模块的姿态细化网络在不对每个对象进行微调的情况下即可给出准确的最终姿态。
更好的研究,从现在开始
从论文设计到论文写作,大幅缩短您的研究时间。
无需绑定信用卡
本解读由 AI 生成,并经人工编辑审核。