[논문 리뷰] FoundationPose-TensorRT
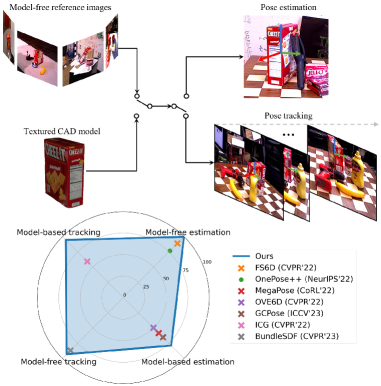
FoundationPose는 새로운 객체의 6D 포즈 추정 및 추적을 위한 단일한 foundation 모델로, 모델 기반 및 모델 프리 설정 모두에서 사용할 수 있으며, 신경 암시적 표현과 대규모 합성 데이터로 미세조정 없이 테스트 시 일반화가 가능하도록 한다.
TensorRT-accelerated 6DoF object pose estimation and tracking based on FoundationPose. Given an RGB-D image, a 3D mesh of the object, and an initial segmentation mask, the model estimates the object pose and tracks it across subsequent frames. Credits The core inference code is derived from tao-toolkit-triton-apps, with the heavy Triton Inference Server dependencies removed and replaced by a direct TensorRT backend. The ONNX models are provided by isaac_ros_foundationpose. Setup 1. CUDA and TensorRT dependencies Install CUDA 12.4 + cuDNN 9.8 and TensorRT 10.9.0 into a local `deps/` folder: source scripts/deps.shactivate_deps This downloads and installs the dependencies locally - no system-wide installation required. The environment variables (`CUDA_HOME`, `TENSORRT_HOME`, `PATH`, `LD_LIBRARY_PATH`) are only active in the current shell session. Run `deactivate_deps` to restore the original environment. To use a different CUDA or TensorRT version, edit `scripts/deps.sh`. Make sure the PyTorch CUDA version matches (see step 2). 2. Python environment Create and activate a Python environment, e.g. with conda: conda create --name fp_tensorrt python=3.10conda activate fp_tensorrt Then install all Python dependencies (requires `activate_deps` to be active): source scripts/deps.sh && activate_depsbash scripts/setup.sh This installs PyTorch 2.5.0 (CUDA 12.4), nvdiffrast, pytorch3d, TensorRT Python bindings, and other required packages. 3. Model compilation Download the ONNX models from NVIDIA NGC and compile them into TensorRT engine files: bash scripts/convert_onnx.sh This produces weights/tensorrt/refiner_cs252.plan and weights/tensorrt/scorer_cs252.plan. chunk_size variable inside convert_onnx.sh controls the maximum batch size of the TensorRT engines (default: 252). A smaller value reduces VRAM usage, which is useful when tracking multiple objects simultaneously or on memory-constrained GPUs. To change it, edit the chunk_size variable before running and use the matching value in FoundationPoseWrapperConfig. Usage Demo Run the benchmark on the YCB mustard bottle sequence (demo data is downloaded automatically): source scripts/deps.sh && activate_depspython demo.py This runs initial pose estimation on the first frame and tracks the object across the remaining frames, printing per-frame poses and mean inference times. Python API from foundationpose_tensorrt import FoundationPoseWrapper, FoundationPoseWrapperConfig cfg = FoundationPoseWrapperConfig( downsample_width=None, # Set e.g. to 256 for faster inference at lower accuracy est_refine_iter=5, # Refinement iterations for initial pose estimation track_refine_iter=2, # Refinement iterations for tracking chunk_size=252, # Must match the `chunk_size` of the compiled TensorRT engine)wrapper = FoundationPoseWrapper(cfg=cfg) # Set camera intrinsics (3x3 numpy array)wrapper.set_camera_intrinsics(K) # Load object meshmesh = FoundationPoseWrapper.load_mesh("path/to/mesh.obj") # --- First frame ---wrapper.reset_scene(color, depth) # color: (H,W,3) uint8, depth: (H,W) float32 in meterspose = wrapper.add_object("object_name", mesh, mask) # mask: (H,W) bool # --- Subsequent frames ---poses = wrapper.step_scene(color, depth) # returns dict[name -> (4,4) numpy array] # Visualizevis = wrapper.render_results() # returns BGR image with projected bounding box and axes Poses are returned as 4x4 homogeneous transformation matrices (object-in-camera frame). Project structure scripts/ deps.sh # Install/activate CUDA, cuDNN, TensorRT locally setup.sh # Install Python dependencies convert_onnx.sh # Download ONNX models and compile to TensorRTsrc/foundationpose_tensorrt/ wrapper.py # High-level FoundationPoseWrapper API model.py # TensorRT engine wrapper and FoundationposeModel postprocessor.py # Rendering, cropping, and pose utilitiesweights/ onnx/ # Downloaded ONNX models tensorrt/ # Compiled TensorRT .plan filesdemo.py # Benchmark on YCB mustard data
연구 동기 및 목표
- 다양한 시나리오에 걸친 보이지 않는 객체의 견고한 6D 포즈 추정 및 추적 동기를 부여한다.
- 새로운 객체에 대해 모델 기반과 모델 프리 테스트 시나리오를 모두 지원하는 단일 프레임워크를 개발한다.
- 합성 데이터 생성, 대규모 훈련, 통합된 아키텍처 설계를 통해 강한 일반화를 달성한다.
- 새로운 시점 합성을 가능하게 하는 신경 암시적 객체 표현을 통해 모델 기반과 모델 프리의 간극을 연결한다.
제안 방법
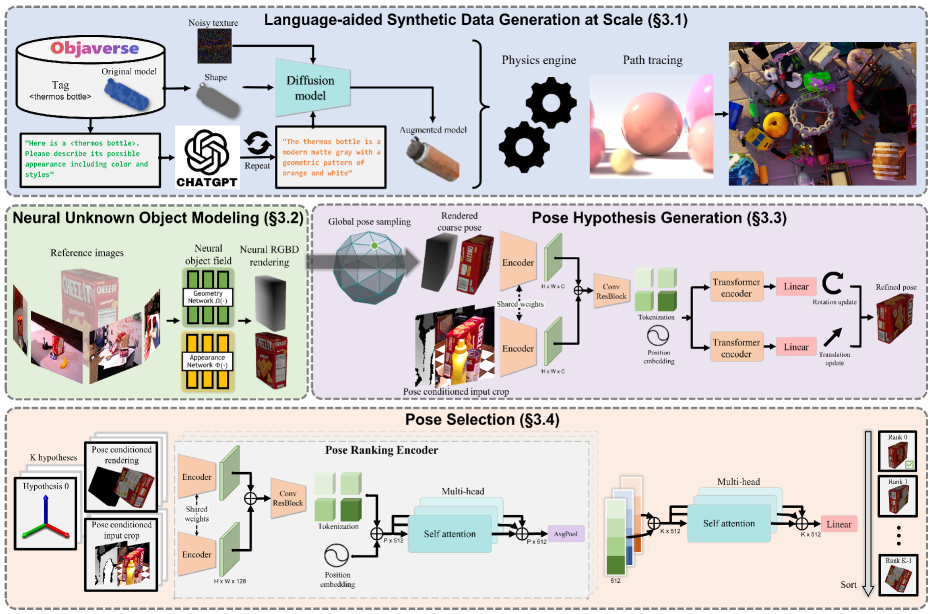
- RGBD 렌더링을 위한 객체 중심의 신경 암시적(SDF 기반) 객체 필드를 도입한다.
- 합성 질감을 다양화하기 위해 LLM 및 확산 기반 텍스처 보강을 사용한다.
- 렌더링된 뷰에서 거친 포즈 가설을 업데이트하는 트랜스포머 기반 포즈 정제 네트워크를 학습한다.
- 계층적 포즈 비교와 대조적 순위 손실을 갖춘 포즈 선택 모듈을 구현한다.
- 포즈 가설을 렌더링하고 평가하기 위해 소수의 기준 뷰로 테스트 시 추론을 수행한다.
- 전통적인 그래픽 파이프라인의 대체로 사용할 수 있는 모델 비의존 렌더링을 제공한다.
실험 결과
연구 질문
- RQ1하나의 통합 프레임워크가 모델 기반과 모델 프리 설정 모두에서 새로운 객체에 대한 6D 포즈 추정 및 추적을 수행할 수 있는가?
- RQ2신경 암시적 객체 표현이 다양한 객체와 질감에 걸쳐 효과적인 새로운 시점 합성과 견고한 포즈 추정을 가능하게 하는가?
- RQ3LLM과 확산 모델의 도움으로 합성 데이터가 미세조정 없이 보이지 않는 객체에 얼마나 일반화될 수 있는가?
- RQ4계층적 포즈 비교와 대조적 순위가 정확한 포즈 선택에 어떤 이점을 제공하는가?
주요 결과
- 제안된 FoundationPose 프레임워크는 각 작업에 특화된 기존 방법들(포즈 추정 또는 추적, 모델 기반 또는 모델 프리)을 능가한다.
- 이 접근법은 새로운 객체에 대해 미세조정 없이도 인스턴스 수준 방법과 경쟁력 있는 결과를 달성한다.
- 신경 객체 필드는 효율적인 RGBD 렌더링과 효과적인 포즈 가설 평가를 가능하게 하여 모델 기반과 모델 프리 설정을 연결한다.
- LLM 및 확산 기반 텍스처 보강은 합성 훈련의 데이터 다양성을 크게 향상시켜 일반화를 개선한다.
- 포즈 조건화 자르기와 계층적 포즈 순위 모듈을 갖춘 포즈 정제 네트워크가 개별 객체별 미세조정 없이도 정확한 최종 포즈를 산출한다.
더 나은 연구,지금 바로 시작하세요
연구 설계부터 논문 작성까지, 연구 시간을 획기적으로 줄여보세요.
카드 등록 없음 · 무료 플랜 제공
이 리뷰는 AI가 만들고, 인간 에디터가 검토했습니다.